That musty smell you can’t quite place? The slight warp in your hardwood floors? These are often clues that your home’s real problem lies beneath your feet. Your crawlspace is sitting on top of damp earth, which constantly releases moisture vapor. This unseen humidity can lead to wood rot, pest infestations, and poor indoor air quality. A crawlspace vapor barrier is your first and most effective line of defense. It’s a heavy-duty liner that separates your home’s structure from the damp ground, stopping moisture at the source and protecting your home’s health from the ground up.
Key Takeaways
- Protect your home from the ground up: A vapor barrier's main purpose is to stop ground moisture from entering your crawlspace, which helps prevent common issues like mold, wood rot, and pest infestations.
- Material quality is critical for success: The thickness and durability of your vapor barrier matter. Choose a puncture-resistant liner that is at least 10-mil thick to ensure it provides lasting protection against moisture.
- Proper installation is non-negotiable: A vapor barrier cannot fix existing water leaks, so those must be addressed first. The barrier must also be perfectly sealed at all seams and edges to be effective, which is why professional help is often the best choice.
What Is a Crawlspace Vapor Barrier?
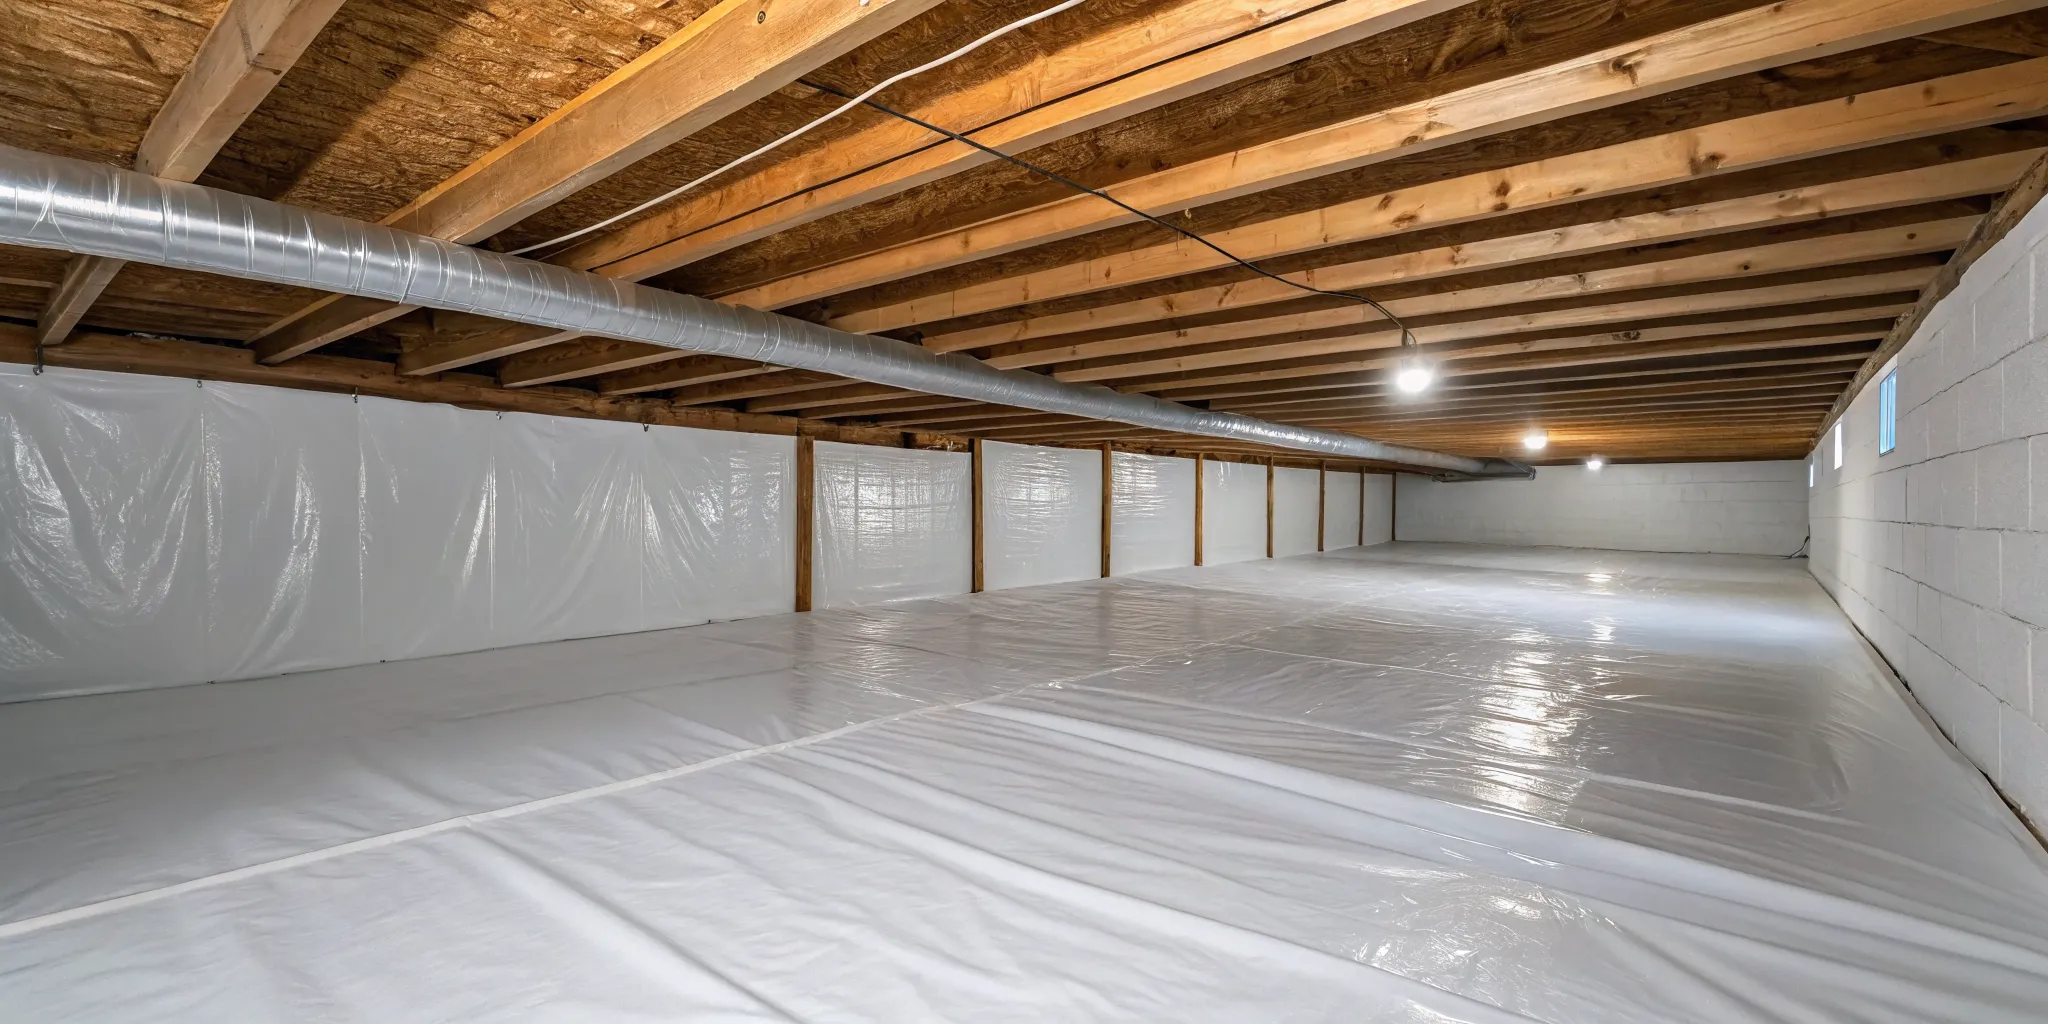
If you’ve ever heard someone mention a vapor barrier, you might have pictured something complicated. In reality, it’s a straightforward and effective solution to a very common problem: moisture. A crawlspace vapor barrier is a heavy-duty sheet of plastic that gets installed across the entire dirt or gravel floor of your crawlspace. Think of it as a protective liner between the damp ground and the structure of your home. Its one and only job is to stop water vapor from the soil from rising up and creating a damp, unhealthy environment under your house.
This simple sheet of plastic is a fundamental part of keeping your home’s foundation dry and its air clean. By blocking ground moisture at the source, a vapor barrier helps prevent a whole host of issues, from wood rot and mold growth to pest infestations and high energy bills. It’s often the first and most important step in a process called crawlspace encapsulation, which completely seals the area from outside moisture and air. Understanding how this barrier works is the first step toward a healthier home.
How Does a Vapor Barrier Work?
The ground beneath your house naturally contains a lot of moisture. Through evaporation, this moisture turns into water vapor and rises, heading straight for the wooden structures of your home’s subfloor. A vapor barrier works by physically blocking this process. The thick, impermeable plastic sheeting is laid directly on the ground, stopping the water vapor in its tracks. It can’t pass through the barrier, so it can’t get into your crawlspace to cause problems. This simple separation protects your floor joists, insulation, and foundation from the constant threat of moisture, which is essential for maintaining your home’s structural integrity.
Protecting Your Air Quality and Preventing Mold
A damp, dark crawlspace is the perfect breeding ground for mold and mildew. When moisture levels are high, mold can grow on wood, insulation, and any other organic material it finds. What many people don't realize is that a large portion of the air you breathe inside your home actually comes up from the crawlspace. This is known as the "stack effect." It means that mold spores, musty odors, and allergens can easily find their way into your living areas. A vapor barrier is your first line of defense. By keeping the crawlspace dry, you can effectively prevent mold growth and protect your family’s respiratory health.
Telltale Signs You Need a Vapor Barrier
Not sure if your crawlspace is a problem? Your house might be giving you clues. If you notice any of these issues, it’s a strong sign that you have a moisture problem that a vapor barrier could help solve.
- A persistent musty or earthy smell in your home
- Warping or cupping hardwood floors
- A feeling of high humidity or dampness indoors
- Visible mold or mildew on surfaces in the crawlspace
- Condensation or "sweating" on pipes and ductwork
- Damp or muddy soil under the house
If you see standing water, a vapor barrier alone won't be enough. You'll likely need a drainage system first. A professional can assess your specific situation and recommend the right solution.
What Moisture Problems Can a Vapor Barrier Solve?
A vapor barrier does more than just cover the dirt floor of your crawlspace; it’s a fundamental part of protecting your home’s health and structural integrity from the ground up. Excess moisture seeping in from the soil can trigger a cascade of expensive and unhealthy problems, from rotted floor joists to poor indoor air quality. By blocking this moisture at the source, a properly installed vapor barrier acts as your home’s first line of defense. It solves several critical issues before they have a chance to start, creating a drier, healthier, and more efficient home.
Preventing Wood Rot and Foundation Damage
The wooden beams and joists that support your floors are highly vulnerable to moisture. When water vapor rises from the soil in your crawlspace, it gets absorbed by this wood, creating the perfect conditions for fungal growth and wood rot. Over time, this decay can seriously compromise your home's structural integrity, leading to sagging floors and expensive repairs. A vapor barrier stops this process by preventing ground moisture from ever reaching the wooden framework of your house. This simple layer of protection is one of the most effective ways to preserve your home’s foundation and support structures for the long haul, ensuring your investment remains safe and sound.
Stopping Mold and Mildew Growth
Your crawlspace is naturally dark, and when you add moisture, it becomes an ideal breeding ground for mold and mildew. These fungi aren't just unsightly; they release spores that can travel up into your living spaces through gaps in the flooring and ductwork. This can negatively impact your home's air quality and potentially cause health issues. A vapor barrier makes the crawlspace environment inhospitable to mold by cutting off its water source. By keeping the area dry, you eliminate a key ingredient mold needs to thrive. This is a crucial step in any effective mold removal strategy and helps ensure the air your family breathes is clean and healthy.
Keeping Pests Out
Pests like termites, cockroaches, spiders, and rodents are drawn to dark, damp, and sheltered environments. An unprotected crawlspace is basically a welcome mat for these unwanted guests. They seek out moisture and can cause significant damage to your home, from chewing through wires to destroying wooden structures. Installing a vapor barrier helps create a clean, dry, and sealed space that is far less attractive to pests. It not only removes the dampness that attracts them but also acts as a physical shield, making it much more difficult for them to find a way inside. This makes your home a less inviting target for critters looking for a place to live.
Lowering Your Energy Bills
Did you know that a damp crawlspace can make your energy bills more expensive? Humid air is harder to heat and cool than dry air. When moisture from your crawlspace infiltrates your home, your HVAC system has to work much harder to maintain a comfortable temperature, consuming more energy in the process. This extra workload leads to higher utility bills month after month. By installing a vapor barrier, you help control the humidity levels throughout your home. This allows your heating and cooling systems to operate more efficiently, saving you money and reducing wear and tear on your equipment. It's a smart investment that pays for itself over time.
What Are Vapor Barriers Made Of?
When you picture a vapor barrier, you might just think of a simple sheet of plastic. But the materials used are specifically engineered to stop moisture in its tracks. They are not the same as the thin plastic drop cloths you might find at a hardware store for painting. Choosing the right material is a critical step in protecting your home from moisture damage, mold, and pests. The primary job of any vapor barrier is to have a very low permeability, meaning it is extremely difficult for water vapor to pass through it. This key characteristic is what separates a true vapor barrier from a simple plastic liner.
Crawlspace vapor barriers come in a few primary types, each with its own strengths. The most common options are polyethylene sheeting, reinforced liners, and foil-faced barriers. The best choice for your home depends on factors like the current condition of your crawlspace, how you use the space, and your long-term goals for energy efficiency and durability. A professional will assess your home's specific needs to recommend the right material, ensuring you get a solution that lasts. A proper installation with the right material is your first line of defense against the conditions that lead to mold growth, which can compromise your home's air quality and structure.
Polyethylene Sheeting
Polyethylene sheeting is the most common material used for crawlspace vapor barriers, and for good reason. It’s a heavy-duty plastic liner, typically ranging from 10 to 20 mil in thickness. For context, one "mil" is a thousandth of an inch, so these liners are much thicker and more durable than a standard trash bag. This material is designed to be installed over the ground and sometimes along foundation walls to effectively block soil moisture from seeping into your crawlspace. It's a reliable and effective standard for most residential applications. Think of it as the workhorse of vapor barriers, creating a clean surface that separates your home from the damp earth below.
Reinforced Liners
If your crawlspace is used for storage or requires frequent access for maintenance, a reinforced liner is an excellent upgrade. For those seeking heavy-duty, long-term protection, 20 mil reinforced vapor barriers are an excellent choice. The "reinforcement" usually comes from a polyester cord or scrim layered within the polyethylene. This grid adds incredible tear and puncture resistance, so you do not have to worry about damaging the barrier when moving items or working in the space. It is the ideal choice for homeowners seeking maximum durability and peace of mind, especially in crawlspaces with uneven or rocky ground where a standard liner might get damaged.
Foil-Faced Barriers
Foil-faced barriers take crawlspace protection a step further by adding an energy-saving component. These barriers are often utilized in conjunction with insulation materials and serve a dual purpose. While the plastic backing stops ground moisture, the foil layer reflects heat. In the winter, it helps keep heat inside your living space, and in the summer, it reflects heat away from your floors. This can help reduce energy costs while also preventing moisture from entering the crawlspace. This type of barrier is a key part of a fully encapsulated system, and this comprehensive approach is what we specialize in at Remtech Environmental.
Does Vapor Barrier Thickness Matter?
Yes, the thickness of your vapor barrier absolutely matters. Think of it like the difference between a flimsy grocery bag and a heavy-duty contractor bag. While both can hold things, one is clearly built to withstand more stress and prevent leaks. Vapor barrier thickness is measured in "mils," where one mil is one-thousandth of an inch. The thicker the barrier, the more resistant it is to punctures, tears, and general degradation over time.
Choosing the right thickness is crucial for the long-term health of your home. A thin, easily damaged barrier won't effectively stop moisture from seeping into your crawlspace, which can lead to the very problems you're trying to prevent, like mold growth and wood rot. The right choice depends on the condition of your crawlspace floor (is it smooth dirt or rocky?) and how you plan to use the space (is it just for utilities, or will you use it for storage?). A professional installation will always start with an assessment to determine the most effective and durable solution for your specific needs, which is a key part of a complete mold removal strategy.
Understanding 6-Mil Barriers
A 6-mil vapor barrier is the thinnest option you'll typically find and is often the minimum thickness required by building codes. While it’s better than no barrier at all, it’s highly susceptible to rips and punctures during installation and from any future activity in the crawlspace. Because it’s so thin, it can easily be torn by sharp rocks, debris, or even just by crawling over it to perform maintenance. While its low cost is appealing, a 6-mil barrier is generally not recommended for a durable, long-term solution. It’s a temporary fix at best and won't provide the robust protection your home deserves.
When to Use 10- to 12-Mil Barriers
For most homes, a 10- or 12-mil vapor barrier hits the sweet spot between durability and cost. This thickness provides a significant upgrade in puncture and tear resistance compared to a 6-mil liner. It can withstand moderate foot traffic and is a solid choice for crawlspaces that are used for light storage or require occasional access for plumbing or electrical work. Many suppliers find that a 12-mil reinforced barrier is a popular choice for homeowners seeking reliable, long-lasting protection. This is the thickness that provides peace of mind without necessarily requiring the investment of a top-tier, heavy-duty product.
The Benefits of 20-Mil Barriers
When you need the ultimate in protection, a 20-mil vapor barrier is the answer. This is the heavy-duty, top-of-the-line option designed for maximum durability. Its thickness makes it extremely resistant to punctures, tears, and abrasion, making it ideal for crawlspaces with rough, rocky surfaces or those that will be used for heavy storage. If you plan on frequently accessing your crawlspace, a 20-mil barrier ensures it can handle the wear and tear without compromising its integrity. Investing in a 20-mil barrier is about ensuring the job is done right the first time, providing a permanent solution that is a core part of a professional environmental remediation plan.
Key Features to Look For in a Vapor Barrier
When you start shopping for a crawlspace vapor barrier, you’ll quickly realize they aren’t all the same. It can feel a bit like standing in a hardware store aisle, staring at a wall of options and wondering if there’s really a difference. I promise you, there is. Choosing the right material is a huge factor in how well it protects your home from moisture, mold, and pests. Think of it like buying a raincoat; a cheap poncho might get you through a light drizzle, but you’ll want something more substantial for a real storm. Your crawlspace deserves the heavy-duty raincoat.
The effectiveness of your vapor barrier comes down to its permeability, durability, and how it’s installed. A high-quality barrier should be tough enough to withstand occasional foot traffic for maintenance, properly sealed to prevent any moisture from creeping in, and made from materials that won’t break down or contribute to bad odors over time. It also needs to meet local building codes, which are in place to ensure your home is properly protected. Understanding these features will help you make an informed decision and ensure your investment provides long-term peace of mind and protects your home’s value.
Perm Rating: What It Is and Why It Matters
The "perm rating" of a vapor barrier sounds technical, but it’s just a measure of how much water vapor can pass through it. For a crawlspace, you want this number to be as low as possible. A material with a perm rating below 0.1 is considered a Class I vapor retarder, which is the industry standard for effectively blocking ground moisture. This ensures that dampness from the soil doesn't evaporate into your crawlspace and create a humid environment.
However, a vapor barrier is most effective when you also find and fix where the moisture is coming from. It’s a critical part of a larger moisture control system. If you have existing water intrusion or high humidity, the barrier will prevent ground moisture from adding to the problem, but it won't solve leaks on its own. That's why a professional assessment is key to addressing the root cause of crawlspace mold.
Durability: Puncture and Tear Resistance
Your crawlspace might not be a high-traffic area, but it still needs a vapor barrier that can hold up over time. Durability is measured in "mils," where one mil is one-thousandth of an inch. While 6 mil is a common minimum requirement, it can tear easily. For better durability, a 10- to 14-mil thickness is recommended, especially if you plan to use the space for storage. For crawlspaces that see more activity, a 15- to 20-mil reinforced liner offers the best long-term protection against punctures and tears. A small rip can compromise the entire system, so investing in a tougher material from the start is a smart move. You can find more details on materials in our resource library.
Secure Seams and Overlaps
A vapor barrier is only as good as its weakest point, which is often the seams. The barrier should cover the entire ground surface, with sections overlapping by at least 6 to 12 inches. These overlaps must be sealed with specialized, waterproof tape to create a continuous, unbroken shield against moisture. The liner also needs to be sealed to the foundation walls, support piers, and around any pipes or plumbing that penetrate the space. If these areas are left unsealed, moisture vapor will find its way through the gaps, defeating the purpose of the installation. Proper sealing is a detailed process, so if you have questions, it's always best to contact a professional.
Antimicrobial and Odor-Resistant Properties
When you seal a crawlspace, you want to be sure the materials you’re using won't cause new problems. Some lower-quality vapor barriers are made with glues or recycled fibers that can break down in a damp environment and produce a musty or chemical smell. High-quality, 100% virgin polyethylene barriers are a better choice because they are solid and inert. Many of these premium liners are also manufactured with antimicrobial additives. This treatment helps prevent mold, mildew, and bacteria from growing on the surface of the barrier itself, giving you an extra layer of protection and contributing to healthier air in your home. Our team at Remtech Environmental prioritizes materials that ensure a clean and healthy environment.
Meeting Local Building Codes
Building codes aren't just suggestions; they are legal requirements designed to ensure your home is safe and structurally sound. Many local building codes now mandate the installation of a crawlspace vapor barrier, often specifying a minimum thickness, like 6 mil. A professional installer will be familiar with the specific regulations in your city, whether it's Raleigh, Durham, or another one of our service areas. This local knowledge is crucial, as codes can vary. Following these rules is essential for the barrier to perform correctly and to pass a home inspection if you decide to sell in the future. Choosing a compliant material and installation method ensures your project is done right the first time.
How Much Does a Crawlspace Vapor Barrier Cost?
Talking about cost is always tricky because every home is different. The final price for a crawlspace vapor barrier depends on a few key things: the size of your crawlspace, the quality of the materials you choose, and whether you hire a professional or do it yourself. Think of it less as a cost and more as an investment in your home’s health and structural integrity. A properly installed barrier can save you from much more expensive repairs down the road, like fixing rotted floor joists or dealing with a major mold problem.
The total expense is a combination of materials and labor. Crawlspace vapor barrier costs can vary significantly based on the thickness and durability of the plastic sheeting. On top of that, professional installation involves labor for cleaning the space, laying the barrier, and meticulously sealing every seam and edge. If your crawlspace has existing moisture problems, you may also need to budget for drainage solutions before the barrier can even be installed. We’ll break down each of these factors so you can get a clearer picture of the potential investment.
Breaking Down Material Costs
The vapor barrier itself is the main material cost. The price is usually determined by the thickness (measured in mils) and overall quality of the sheeting. For example, a premium 15-mil roll designed for a 1,400-square-foot area can run between $450 and $480. Thinner, less durable options will be cheaper, while thicker, reinforced liners will cost more. You’ll also need to account for other supplies like specialized seam tape, fasteners for securing the barrier to walls and piers, and caulk for sealing around pipes. These smaller items can add up, so be sure to include them in your budget calculations.
Factoring in Professional Installation
While a DIY approach saves on labor, professional installation ensures the job is done right. Labor is often the largest part of the total cost, and for good reason. A professional team handles the entire process, from clearing out debris and old, failing liners to precisely cutting and sealing the new barrier. Some homeowners have seen quotes as high as $17,000 for a complete encapsulation project, with up to $2,000 of that just for removing the old materials. When you get a professional quote, you're paying for expertise that prevents future moisture intrusion and protects your investment.
Premium vs. Budget-Friendly Options
Vapor barriers are not a one-size-fits-all product. They come in various thicknesses, from a thin 4-mil sheet to a heavy-duty 20-mil liner. You can also choose between non-reinforced, reinforced, and woven-coated options. A basic, thinner barrier might be sufficient for a small, clean crawlspace with no foot traffic. However, if you plan to use your crawlspace for storage or if the ground is rough and rocky, investing in a thicker, puncture-resistant reinforced liner is a smart move. The right choice depends on your specific needs and how much durability you require.
Why Drainage Might Be an Added Cost
A vapor barrier is designed to stop moisture vapor from the ground from entering your crawlspace, but it can’t fix an active water problem. If you have standing water or significant seepage after it rains, you’ll need to address that first. Installing a vapor barrier over a puddle will only trap the water, creating a perfect environment for mold and rot. To properly manage water issues, you may need to invest in a perimeter drain, a sump pump, or exterior grading. These are separate costs but are essential for ensuring your vapor barrier can do its job effectively.
4 Common Crawlspace Vapor Barrier Myths
When it comes to crawlspaces, a little bit of misinformation can lead to big problems. Vapor barriers are a hot topic, and unfortunately, there are quite a few myths floating around that can steer homeowners in the wrong direction. Getting the facts straight is the first step toward protecting your home from moisture damage, mold, and poor air quality. Let's clear up some of the most common misconceptions so you can make an informed decision for your property.
Myth #1: "Any Plastic Sheeting Works"
It’s easy to think that any plastic sheet from the hardware store can do the job, but this is one of the most damaging myths out there. A true crawlspace vapor barrier is not just any piece of plastic. It’s a heavy-duty polyethylene liner, typically between 10 and 20 mils thick, specifically engineered to stop water vapor from the soil from entering your crawlspace. Thin, cheap plastic sheeting can tear easily during installation or become punctured by rocks or foot traffic. These small holes defeat the entire purpose of the barrier, allowing moisture to seep through and potentially cause the very mold problems you’re trying to prevent. Using the right material is non-negotiable for effective, long-term protection.
Myth #2: "A Vapor Barrier Is a Cure-All"
A vapor barrier is an excellent tool, but it isn't a magic wand for every moisture issue. Its primary job is to block moisture evaporating from the ground. If your crawlspace has standing water, active leaks from pipes, or foundation cracks letting water in, a vapor barrier alone won't solve the problem. In fact, laying a barrier over a puddle will just trap the water, creating a swampy mess underneath. Before installation, it's critical to identify and fix the root cause of any water intrusion. This might mean you need to install a sump pump, repair foundation cracks, or improve your property's exterior drainage first. A professional assessment can help you create a complete plan.
Myth #3: "They're Only for Humid Climates"
While homes in humid regions certainly need moisture control, the idea that vapor barriers are unnecessary elsewhere is a mistake. The ground beneath your house contains moisture, regardless of the local climate. Through evaporation, this moisture will constantly rise and enter your crawlspace. Over time, that persistent vapor can rot the wooden structures of your home, ruin your insulation, and degrade your indoor air quality. A vapor barrier is a fundamental part of protecting your home’s foundation and structure from the ground up. As a team with deep roots in North Carolina, we at Remtech Environmental know that managing ground moisture is a year-round priority for local homeowners.
Myth #4: "It's a One-and-Done Fix"
Installing a vapor barrier is a huge step in the right direction, but it’s not the final chapter in crawlspace maintenance. A vapor barrier is most effective as part of a comprehensive system. For it to work correctly, you must first resolve any existing drainage or leak issues. After installation, it’s also important to ensure all seams, pillars, and foundation walls are completely sealed to prevent any gaps. Depending on your home, you may also need to consider adding a dehumidifier or encapsulating the space fully to control air moisture. Think of the vapor barrier as a critical component, not a standalone solution. Regular inspections will ensure it remains intact and effective for years to come.
A Step-by-Step Guide to Vapor Barrier Installation
Installing a vapor barrier is a detailed process that requires careful attention at every stage. While it might seem like a straightforward DIY project, getting it wrong can trap moisture instead of blocking it, creating bigger problems down the road. This guide breaks down the essential steps involved in a professional installation. Following these procedures ensures the barrier functions correctly, protecting your home’s foundation and air quality for years. For homeowners in North Carolina, understanding these steps can also help you know what to expect when you hire a professional team to handle the job.
Step 1: Find and Fix Existing Moisture Issues
Before a single sheet of plastic is unrolled, you have to address the source of the moisture. A vapor barrier is designed to stop ground moisture from evaporating into your crawlspace; it can’t fix an active leak or a drainage problem. If you have standing water, you must find out why it’s there. This could mean repairing leaky pipes, regrading the soil around your foundation, or installing a sump pump. Tackling these underlying issues first is non-negotiable. Skipping this step and simply covering up a wet floor will only trap water, leading to accelerated mold growth and wood rot. A professional water damage restoration assessment can identify and resolve these core problems.
Step 2: Clean and Prep the Crawlspace
Once all water issues are resolved, the crawlspace needs a thorough cleaning. This means removing all debris, including rocks, wood scraps, old construction materials, and any failing insulation. Sharp objects can puncture the new barrier, rendering it useless. The ground surface should be raked and smoothed as much as possible to create an even base. This is also the critical stage to address any existing biological growth. If you find mold or mildew, it must be properly remediated before being covered. Our mold removal services ensure that the space is clean and safe before the encapsulation process begins, preventing future contamination.
Step 3: Lay and Secure the Barrier
With a clean and dry crawlspace, it’s time to lay the barrier. The polyethylene sheeting should cover 100% of the exposed earth. Start by unrolling the material, overlapping any seams by at least 6 to 12 inches to create a continuous shield. The barrier should also extend up the foundation walls, stopping just below the floor joists to leave a small gap for termite inspections, as required by many local building codes. The material is secured to the walls and support piers using mechanical fasteners and specialized sealants. This ensures the barrier stays in place and provides complete coverage from the ground to the walls.
Step 4: Seal All Seams, Edges, and Gaps
A vapor barrier is only as good as its seal. This is arguably the most critical step and where many DIY installations fall short. Every seam where the sheets overlap must be sealed with a high-quality, waterproof vapor barrier tape. You also need to meticulously seal the barrier around all support piers, plumbing pipes, and electrical conduits that penetrate the floor. This creates an airtight and watertight seal, preventing moisture from finding a way through any gaps. A complete seal is what truly separates a simple plastic liner from an effective encapsulation system that protects your home’s structural integrity and air quality.
Step 5: Plan for Ventilation and Inspections
After the barrier is fully installed and sealed, the final step is to manage the air in the crawlspace. In most modern encapsulation projects, this involves sealing off any foundation vents to the outside. A dehumidifier is then installed to control the relative humidity within the newly conditioned space, keeping it consistently dry. Finally, remember that a vapor barrier isn't a "set it and forget it" solution. It’s important to plan for periodic inspections to check for any tears, separated seams, or new moisture issues. You can contact our team to schedule an annual check-up to ensure your system continues to perform as it should.
Common Installation Mistakes to Avoid
Installing a crawlspace vapor barrier might seem like a simple weekend project, but a few common mistakes can make your efforts completely ineffective. Getting the installation right from the start is the key to protecting your home from moisture, mold, and pests. Let’s walk through the most frequent missteps so you can avoid them and ensure your crawlspace stays dry and healthy for years to come.
Skipping a Pre-Installation Moisture Test
Before you lay down a single sheet of plastic, you need to know where the moisture is coming from. A vapor barrier is designed to stop moisture evaporating from the ground, but it won't do anything about a leaky pipe, foundation crack, or poor exterior drainage. A vapor barrier is most effective when you also figure out and fix the source of the water. If you cover up an existing leak, you’re just trapping the water, which can lead to even bigger problems. A professional moisture assessment can pinpoint the exact cause, ensuring your vapor barrier is a solution, not just a band-aid.
Not Covering Enough Surface Area
A vapor barrier with gaps is like a boat with holes. To be effective, the barrier must cover 100% of the exposed earth in your crawlspace. Any uncovered soil will continue to release moisture into the air, defeating the purpose of the installation. The liner should also extend up the foundation walls by at least a few inches and be sealed tightly. Don’t forget to wrap all support piers completely. The goal is to create a continuous, unbroken shield that separates your home’s structure from the damp ground below, which is a crucial step in preventing mold growth.
Failing to Properly Seal Seams and Edges
Simply overlapping the plastic sheets isn’t enough. For a truly sealed system, all seams must be overlapped by at least 6 to 12 inches and sealed with a specialized, waterproof tape designed for this purpose. Standard duct tape will quickly fail in the damp, cool conditions of a crawlspace. Every seam, edge, and penetration (like pipes or support piers) needs to be meticulously sealed to create a single, monolithic barrier. This attention to detail is what separates a professional job from a DIY attempt that might fail in a year or two.
Ignoring Underlying Drainage Problems
If you have standing water in your crawlspace, a vapor barrier alone will not solve the problem. Laying a plastic liner over puddles or saturated soil is a recipe for disaster, as it traps bulk water against your foundation. In these cases, you need to address the drainage issue first. This might involve installing an interior French drain or a sump pump to actively remove the water. Once the drainage is managed and the crawlspace is dry, you can then install the vapor barrier to control soil moisture evaporation. It’s a two-step process that ensures a lasting solution.
Overlooking Local Building Codes
Building codes exist for a reason: they establish minimum standards for safety and effectiveness. Many municipalities have specific requirements for crawlspace encapsulation, including the minimum thickness of the vapor barrier (often 6-mil or thicker). Before you buy materials or start work, it’s a good idea to check the local codes for your area. Following these guidelines ensures your project is done correctly and won’t cause issues later on. As a company serving many communities, we stay current on the regulations across all our service areas to ensure every job is compliant.
DIY or Professional Job: What's the Right Call?
Deciding whether to install a crawlspace vapor barrier yourself or hire a professional is a common crossroads for homeowners. While the DIY route can seem like a great way to save money, it’s important to weigh the potential savings against the risks of an improper installation. A vapor barrier is more than just a sheet of plastic; it’s a key part of your home’s moisture control system. An improperly installed barrier can trap moisture instead of blocking it, creating a perfect breeding ground for mold and accelerating wood rot. This can end up costing you far more in repairs than the initial professional installation would have.
On the other hand, bringing in a professional ensures the job is done correctly from the start. Experts can accurately diagnose the source of your moisture problems, select the right materials, and guarantee the installation meets local building codes. They have the experience to handle the unique challenges your crawlspace might present, from uneven ground to existing pest issues. This section will help you understand what a professional job entails and identify the clear signs that it’s time to put down the utility knife and pick up the phone. Making the right choice here is crucial for your home's long-term health and your peace of mind.
The Professional Remediation Process
When you hire a professional, you’re getting more than just an installer; you’re getting a strategist for your home’s health. The process begins with a thorough inspection to identify all sources of moisture, not just the obvious ones. If there’s standing water, a simple vapor barrier won’t cut it. A true professional will address that first, potentially recommending a perimeter drain or sump pump to manage water intrusion effectively. The goal is to create a dry foundation for the work. From there, we handle the complete mold removal and cleanup before installing a durable, properly sealed vapor barrier (at least 6 mil thick) that fully isolates your home from ground moisture.
Signs It's Time to Call a Pro
While some home projects are perfect for a weekend warrior, crawlspace encapsulation often isn't one of them. You should absolutely call a professional if you notice any of these red flags. The most critical sign is standing water or saturated soil, as a vapor barrier will only trap that moisture and worsen the situation. Other clear indicators include visible mold growth or a persistent musty smell, which signals an existing problem that needs remediation, not just covering up. If your crawlspace is currently vented, sealing it without a comprehensive plan can also create new problems. If you’re facing any of these issues, it’s best to contact a specialist to ensure the job is done right.
Related Articles
- The Importance of Crawlspace Encapsulation | Remtech Environmental
- Why Is Crawlspace Mold So Common? | Remtech Environmental
- What to Do if You Have Crawlspace Mold | Remtech Environmental
- Crawlspace Mold, Greensboro, NC | Remtech Environmental
- Signs You May Have Crawlspace Mold | Remtech Environmental
Frequently Asked Questions
My house doesn't smell musty. Do I still need a vapor barrier? That’s a great question. It's easy to assume that no musty smell means no moisture problem, but that isn't always the case. The soil under every home contains moisture that constantly evaporates upward. A vapor barrier is a proactive measure to stop this process before it can cause damage. Think of it as protecting your home’s structural wood and indoor air quality for the long term, rather than waiting for a problem like warped floors or a bad smell to appear.
Can I just install a vapor barrier myself to save money? I understand the appeal of a DIY project, but this is one area where professional installation is a very smart investment. The biggest risk is not fixing the true source of moisture first, like a slow leak or poor drainage. A professional can diagnose the entire situation. They also have the right materials and techniques to properly seal every seam, pier, and penetration, which is critical for the barrier to work. A small mistake can trap moisture and create the exact problems you were trying to prevent.
What if I already have standing water or mold? Can I just cover it up? Absolutely not. Covering active water or mold with a vapor barrier is one of the worst things you can do. It will only trap the moisture, creating a swampy, contained environment where mold can thrive and wood rot can accelerate. The first and most important step is to address the source of the water and have any existing mold professionally remediated. Once the space is clean and dry, then a vapor barrier can be installed to prevent future problems.
With all the different thicknesses, what's the best choice for my home? For most residential crawlspaces that won't see a lot of foot traffic, a 10- to 12-mil thick vapor barrier provides a great balance of durability and value. It’s a significant upgrade from the thin 6-mil minimum required by some building codes. However, if your crawlspace has a rough, rocky floor or if you plan to use it for storage, investing in a heavy-duty 20-mil reinforced liner is the best choice for long-term, puncture-resistant protection.
Once a vapor barrier is installed, can I just forget about it? While a professionally installed vapor barrier is very low-maintenance, it shouldn't be completely forgotten. It’s a good idea to have it inspected every year or so to ensure the seams are still sealed and there are no tears. The barrier is also just one part of a complete system. If you have a dehumidifier as part of your encapsulation, it will also need periodic checks. This ensures the entire system continues to protect your home effectively for years to come.