Did you know that up to 50% of the air inside your home can flow up from your crawlspace? This means if your crawlspace is damp, musty, or has mold, those allergens and spores are circulating through your living areas. For families, especially those with allergies or asthma, this can be a serious health concern. Crawlspace encapsulation creates a clean, dry, and healthy environment under your home, drastically improving your indoor air quality. Understanding the crawlspace encapsulation cost is the first step toward creating a healthier home and giving your family the clean air they deserve.
Key Takeaways
- Protect your home from the ground up: Encapsulation is a proactive solution that stops moisture, mold, and pests before they become expensive problems, leading to better air quality and a healthier living environment for your family.
- Invest in a complete solution, not a cheap fix: A proper encapsulation job addresses the root cause of moisture issues, which is why costs vary. Be wary of low quotes that skip essential steps like mold remediation or dehumidification, as they can lead to bigger problems later.
- Hire a professional to avoid costly mistakes: This is not a simple DIY project. Improper installation can trap moisture and worsen mold issues, so hiring an expert who can correctly assess and seal your crawlspace is crucial for a successful, long-lasting result.
What Is Crawlspace Encapsulation?
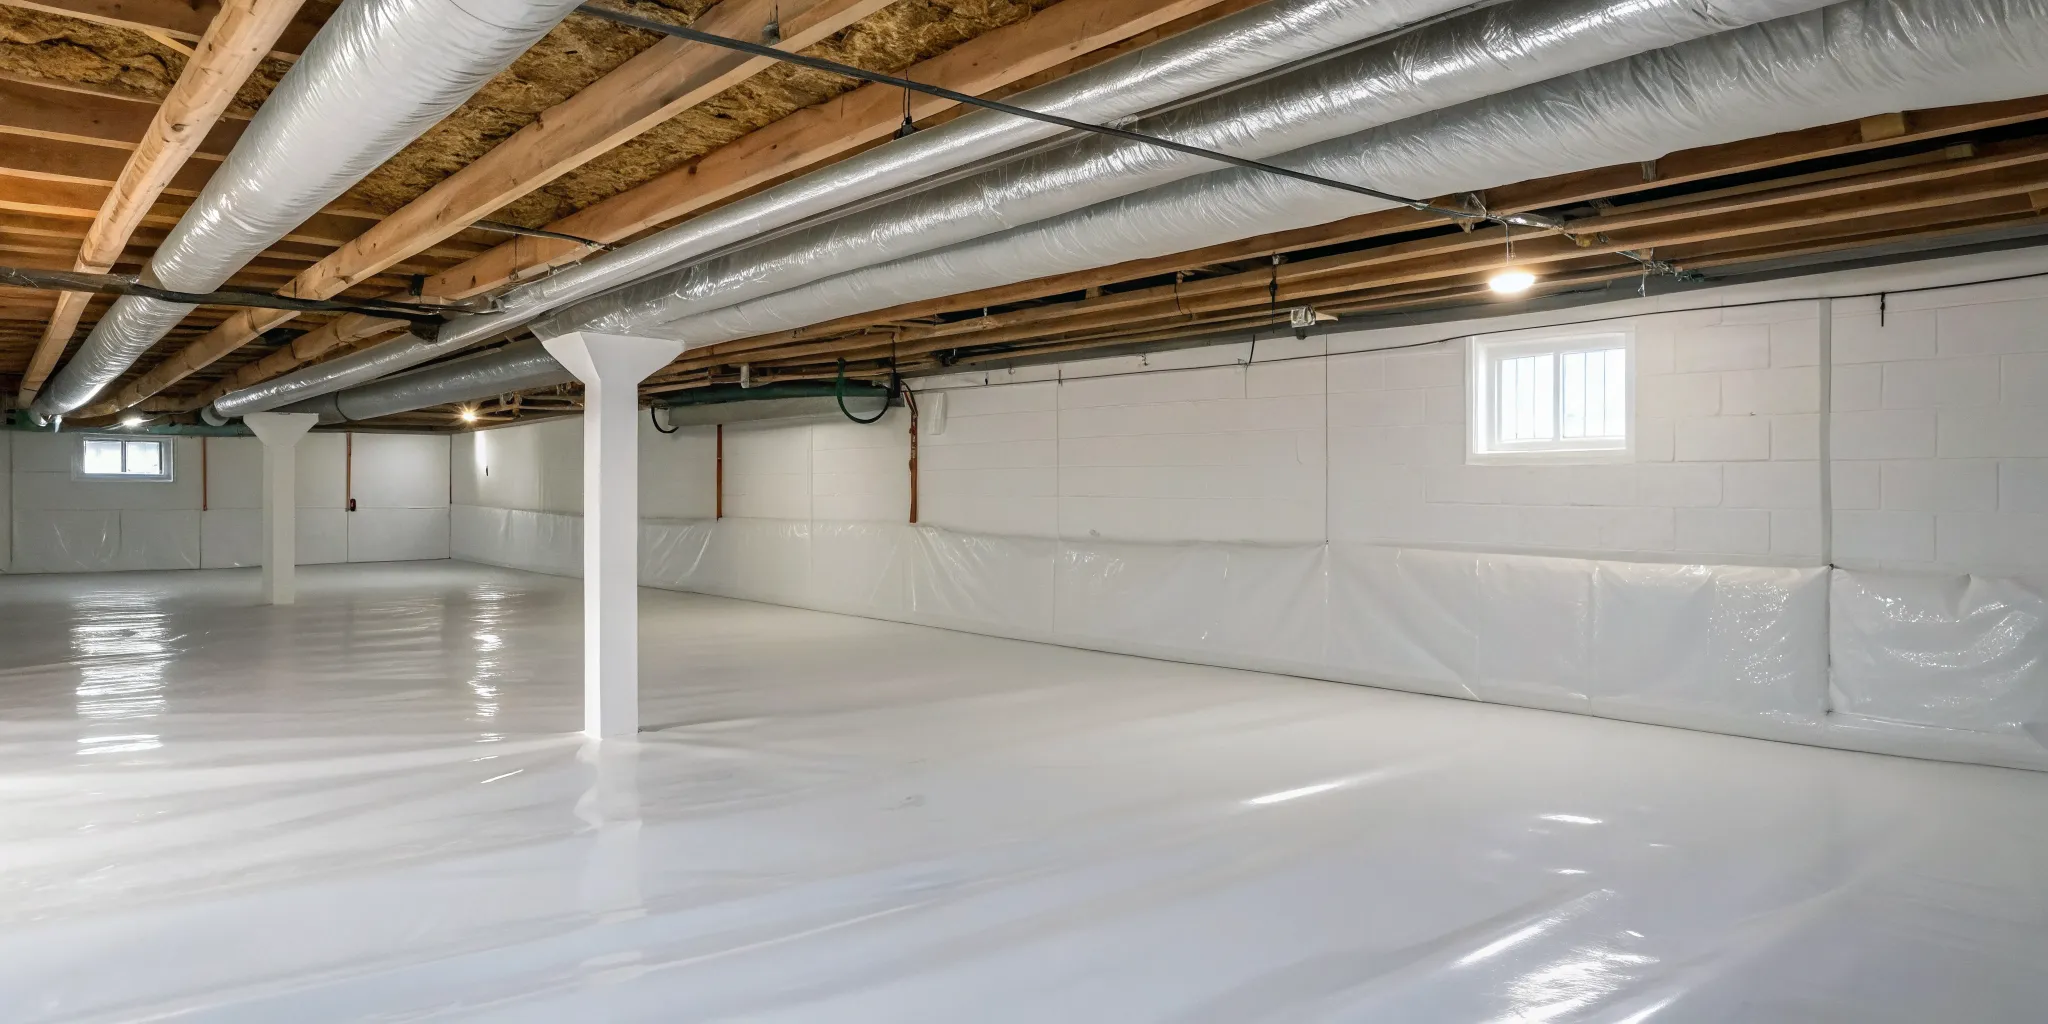
If you’ve ever felt a damp chill in your home or noticed a musty smell you just can’t place, your crawlspace might be the culprit. Think of crawlspace encapsulation as creating a protective bubble around the underbelly of your house. The process involves completely sealing the crawlspace with a heavy-duty moisture barrier, which is essentially a thick, durable plastic sheet. This barrier covers the floor and walls, stopping moisture and outside air from seeping in.
Why does this matter? An unsealed crawlspace is an open invitation for moisture, which can lead to a host of problems like mold growth, wood rot, and pest infestations. All of that can compromise your home’s structural integrity and even affect your family’s health. By sealing off this space, you create a clean, dry, and conditioned environment. This not only helps prevent serious issues like mold contamination but also improves your home's overall energy efficiency and indoor air quality. It’s a proactive step toward protecting your biggest investment and creating a healthier living space from the ground up.
How Does the Encapsulation Process Work?
The encapsulation process is more than just laying down a plastic sheet; it’s a systematic approach to isolate your crawlspace from the ground and outside air. First, a professional will thoroughly inspect the area for any existing problems like standing water, mold, or wood rot. These issues must be addressed before any sealing begins.
Next, the space is cleaned out to remove debris, rocks, and anything else that could puncture the barrier. All outside vents are sealed off, along with any other gaps or cracks that allow air to enter. Insulation is often added to the walls to help regulate the temperature. Finally, the thick vapor barrier is installed across the floor, up the walls, and around any support piers. Every seam is sealed with special tape to create a continuous, airtight lining.
What Materials Are Used?
The star of the show in any crawlspace encapsulation project is the vapor barrier. This isn't your average plastic tarp. It’s a thick, puncture-resistant liner, usually made of polyethylene, designed to completely block moisture from the ground. These barriers come in various thicknesses, with heavier-duty options providing more durability and long-term protection.
Alongside the vapor barrier, professionals use specialized sealing tape to ensure all the seams are airtight and waterproof. To manage temperature and prevent condensation, rigid foam board insulation is typically installed on the crawlspace walls. In some cases, especially in areas with high humidity or existing water issues, a dehumidifier or a sump pump may also be part of the system. You can learn more about these components in our resource library.
How Much Does Crawlspace Encapsulation Cost?
Let’s talk numbers. Budgeting for a home improvement project can feel overwhelming, but understanding the costs upfront makes the process much smoother. Crawlspace encapsulation is an investment, and the price can vary quite a bit based on your home's specific needs. For most homeowners, a complete encapsulation project typically lands somewhere between $5,000 and $15,000. The national average hovers around $5,500 to $7,000 for a standard-sized home with moderate conditions, which gives you a solid baseline to start from.
However, if your crawlspace is particularly large, has existing damage, or requires significant water management, the cost can be higher. Projects involving extensive cleaning, structural repairs, or serious mold removal can range from $15,000 to $40,000. These more complex situations require specialized attention to ensure the problem is solved correctly the first time. On the other hand, a very basic job that only includes a vapor barrier and sealing vents might be as low as $1,500 to $4,000. The final price tag really depends on what your crawlspace needs to become a clean, dry, and healthy part of your home. Think of it less as a single product and more as a customized solution tailored to your property.
Breaking Down the Average Cost
When you get a quote for crawlspace encapsulation, you’re paying for a comprehensive service, not just a sheet of plastic. A full encapsulation typically includes cleaning out debris, sealing all vents and air leaks, installing a durable vapor barrier across the floor and up the walls, and adding a dehumidifier to control moisture levels. For a standard home, this complete solution generally costs between $7,000 and $15,000.
If your crawlspace is already in decent shape, you might only need a basic encapsulation, which could cost between $1,500 and $4,000. This usually involves laying down a vapor barrier and sealing vents but may not include a dehumidifier or extensive sealing. The key is to get a professional assessment to determine exactly what your space needs.
Cost Per Square Foot
Thinking about the cost per square foot can help you create a rough budget based on your home’s size. Generally, you can expect to pay between $3 and $10 per square foot for crawlspace encapsulation. A smaller, straightforward job will fall on the lower end of that spectrum, while a larger space with more complex issues will be on the higher end.
For example, a 1,500-square-foot crawlspace could cost anywhere from $4,500 to $15,000. This range accounts for the quality of the materials used, the condition of the space, and whether additional features like a sump pump are needed. It’s a helpful starting point, but a detailed quote from a professional is the only way to know for sure.
Don't Forget These Additional Costs
It’s important to be aware of potential extra costs that can come up during an encapsulation project. If your crawlspace has standing water or poor drainage, you will likely need a sump pump or an interior drainage system. Installing these can add another $1,000 to $3,000 or more to your total project cost, but they are essential for keeping the space dry long-term.
High humidity is another common issue that requires a professional-grade dehumidifier, which also adds to the final price. The size of your crawlspace is a major factor, as larger areas require more labor and materials. The best way to get a clear picture of your total investment is to schedule a consultation with an expert who can assess your specific situation.
What Factors Influence the Cost of Encapsulation?
Crawlspace encapsulation isn’t a one-price-fits-all service. The final cost depends heavily on the unique conditions of your home. Think of it less like buying a product off the shelf and more like a custom project tailored to your specific needs. Several key factors determine the scope of the work, from the size and condition of your crawlspace to the quality of materials used. A project can range from a few thousand dollars for a small, clean space to a much larger investment for a complex job with existing damage.
Understanding these variables will help you see what goes into a professional quote and why a thorough inspection is so important. Before any work begins, a technician needs to assess your crawlspace to identify any underlying issues that must be addressed for the encapsulation to be effective. This initial evaluation is the only way to get a truly accurate price for protecting your home. To get a clear picture of your specific needs, it's always best to schedule a consultation with a professional.
1. Crawlspace Size
It might seem obvious, but the single biggest factor in your encapsulation cost is the size of your crawlspace. A larger area simply requires more materials and more labor hours to complete the job correctly. Covering a 3,000-square-foot crawlspace will naturally cost more than a 1,000-square-foot one because it demands more vapor barrier, sealing tape, and time from the installation crew. When you request an estimate, the square footage is one of the first pieces of information a contractor will need to give you a preliminary idea of the cost. It sets the baseline for the entire project before any other complexities are considered.
2. Moisture and Drainage Issues
If your crawlspace already has a moisture problem, it needs to be solved before any encapsulation can happen. Sealing a crawlspace with existing water issues just traps the moisture inside, which can lead to even bigger problems down the road. High humidity, puddles of standing water, or poor drainage all add to the project's complexity and cost. Addressing these issues might involve installing an interior drainage system, grading the soil outside your foundation, or repairing leaky pipes. Proper water damage restoration is a critical first step for a successful and long-lasting encapsulation.
3. Vapor Barrier Quality
The primary material used in encapsulation is a heavy-duty plastic liner called a vapor barrier. These barriers come in different thicknesses, which are measured in mils. While a thinner 6-mil liner might be cheaper upfront, a thicker liner (typically 12 to 20 mils) offers far greater durability and resistance to punctures and tears. A high-quality, durable vapor barrier is essential for withstanding foot traffic from future maintenance or repairs under your home. While it affects the price, investing in a thicker, more robust liner ensures your encapsulation system will last for years to come.
4. Existing Mold or Water Damage
During the initial inspection, a technician will look for signs of existing problems like mold growth or wood rot. You cannot simply cover these issues with a plastic liner. Encapsulating over mold is not only ineffective but also hazardous, as it allows the mold to continue growing unseen. Any active mold must be professionally remediated before the encapsulation process begins. The cost of proper mold removal is a separate but necessary expense to ensure the encapsulation creates a truly healthy and protected space under your home.
5. Dehumidifiers and Sump Pumps
For crawlspaces with significant water intrusion or high humidity levels, additional equipment is often necessary. A sump pump is installed at the lowest point of the crawlspace to actively pump out any standing water that collects. A commercial-grade dehumidifier is used to control the moisture content in the air, keeping humidity levels low enough to prevent mold growth and condensation. While not every crawlspace needs this equipment, adding a sump pump or dehumidifier can add a few thousand dollars to the project. However, for wet crawlspaces, they are essential components of an effective encapsulation system.
6. Labor and Location
Labor makes up a significant portion of the total encapsulation cost, and rates can vary based on your geographic location. The complexity of the job also plays a huge role. A clean, empty crawlspace is much easier and faster to work in than one that is cluttered, has low clearance, or requires extensive prep work. Because costs can differ from one area to another, it’s wise to work with a local company that understands the specific environmental challenges and building codes in your region. As a company serving many communities in North Carolina, we have a deep understanding of the conditions specific to our service areas.
Does Homeowners Insurance Cover Crawlspace Encapsulation?
This is one of the biggest questions homeowners have when they get an encapsulation quote: will my insurance help pay for this? It’s a great question, but the answer is a bit of a gray area. Most of the time, standard homeowners insurance policies view crawlspace encapsulation as a home improvement or a preventative measure, similar to upgrading your windows or replacing an old roof before it leaks. Since insurance is designed to cover sudden and accidental damage, they generally don't pay for preventative maintenance. Think of it this way: your policy is there for the "what ifs," not the "might as wells."
However, there are exceptions, and this is where things get interesting. The key is understanding why you need encapsulation. If a sudden event that your policy does cover (like a burst pipe or a severe storm) causes major water damage in your crawlspace, the encapsulation might be considered part of the necessary repairs to restore your home. In this scenario, you have a much stronger case for coverage. It's less about preventing future problems and more about fixing a current, covered one. This is especially true if the damage led to a significant mold problem, which requires comprehensive remediation to make your home safe again. The encapsulation becomes a critical step in the overall restoration process, not just an optional upgrade.
When Your Policy Might Cover It
Your policy is most likely to offer coverage when encapsulation is a direct result of a covered peril. For example, if a washing machine hose fails and floods your crawlspace, your insurance will likely cover the water damage cleanup. If your remediation professional determines that encapsulation is necessary to properly repair the damage and prevent immediate recurrence due to the compromised state of the crawlspace, it could be included in the claim. The argument is that encapsulation is part of making your home "whole" again. However, if you simply want to encapsulate your dry, undamaged crawlspace to lower energy bills, your policy almost certainly won't cover it. It all comes down to whether the work is a repair or an upgrade.
What to Ask Your Insurance Provider
Don't wait for a disaster to find out what your policy covers. The best thing you can do is be proactive. Call your insurance agent and have a direct conversation about your coverage. Go in with specific questions so you can get clear answers instead of vague responses.
Here are a few things you should ask:
- "Does my policy cover water damage from a sudden event, like a burst pipe?"
- "If a covered event damages my crawlspace, are related repairs like encapsulation included in the coverage?"
- "What is my policy's stance on mold remediation?"
- "What documentation would I need to file a claim for crawlspace damage?"
Getting these answers in writing will help you understand your protection and avoid surprises down the road.
Why Encapsulation Pays Off in the Long Run
Thinking about the upfront cost of crawlspace encapsulation can feel a little daunting, I get it. But I always encourage homeowners to think of it as a long-term investment in their home’s health and their family’s well-being, not just another expense. When you seal your crawlspace, you’re not just putting up a plastic barrier; you’re actively solving problems before they start and reaping benefits that pay for themselves over time.
From the air you breathe to the structural foundation of your house, a properly encapsulated crawlspace has a positive ripple effect. It creates a cleaner, healthier, and more efficient home environment. You’ll see the return in lower energy bills, fewer pest problems, and the prevention of costly mold removal or structural repairs. Plus, it adds tangible value to your property, giving you peace of mind and a significant selling point if you ever decide to move. Let’s look at exactly how this investment pays off.
Better Indoor Air Quality
It’s a surprising fact, but a large portion of the air you breathe inside your home actually comes up from the crawlspace. This is due to a phenomenon called the "stack effect," where air naturally flows from the bottom of the house to the top. If your crawlspace is damp, musty, and full of mold spores or allergens, that’s exactly what’s getting pulled into your living areas.
Encapsulation seals off your crawlspace from outside moisture and ground vapor. This creates a clean, dry environment that stops mold growth in its tracks. As a result, the air circulating through your home becomes significantly cleaner and healthier, which is a huge win for anyone, especially families with allergies or asthma.
Lower Energy Bills
A vented or unsealed crawlspace works against your HVAC system all year long. In the summer, hot, humid air enters and makes your air conditioner work harder. In the winter, cold air cools your floors and forces your furnace to run constantly. You’re essentially paying to heat and cool the outdoors.
By sealing the vents and insulating the area, encapsulation acts as another layer of insulation for your entire home. It helps stabilize the temperature, which means your heating and cooling systems don't have to work nearly as hard to maintain comfort. This improved efficiency translates directly into lower energy bills month after month, giving you a clear financial return on your investment.
Preventing Mold and Pests
A dark, damp, and humid crawlspace is the perfect breeding ground for all sorts of things you don’t want in your home. Mold and mildew thrive in these conditions, releasing spores that damage your home and your health. This environment is also a welcome mat for pests like termites, cockroaches, rodents, and other insects that are drawn to moisture.
Encapsulation transforms your crawlspace from a damp haven into a dry, sealed, and inhospitable place for these unwanted guests. By controlling the moisture, you eliminate the single most important element that both mold and pests need to survive. This proactive step helps you avoid the stress and expense of dealing with a full-blown infestation or a serious mold problem down the road.
Protecting Your Home's Structure
Moisture is the number one enemy of your home’s foundation. The wooden beams, joists, and subfloor that make up your home's structural support system are highly susceptible to moisture damage. Over time, constant exposure to dampness and humidity from an unsealed crawlspace can lead to wood rot, which weakens the wood and can compromise the integrity of your entire home.
Encapsulation creates a durable barrier that keeps ground moisture and water vapor away from your home’s foundation. By keeping the structural wood dry, you prevent rot and decay before they can begin. This is one of the most critical long-term benefits, saving you from the possibility of incredibly expensive and disruptive structural repairs in the future.
Increased Home Value
When it comes time to sell, a clean, dry, and encapsulated crawlspace is a huge asset. Homebuyers are more informed than ever, and a damp, musty crawlspace is a major red flag during a home inspection. It signals potential problems with mold, pests, and structural damage that can scare buyers away or lead to lowball offers.
On the other hand, a home with a professionally encapsulated crawlspace tells buyers that the property has been well-maintained. It provides peace of mind and shows that you’ve invested in the home’s long-term health. This can make your home more attractive on the market, help it sell faster, and ultimately increase its overall value. It’s an upgrade that buyers can appreciate and are often willing to pay for.
Is Crawlspace Encapsulation a Worthwhile Investment?
This is the big question, isn't it? Seeing a price tag for encapsulation can be a bit of a shock, and it’s natural to wonder if it’s truly necessary. The short answer is: yes, for most homeowners with a vented or dirt-floor crawlspace, it’s one of the smartest investments you can make in your home’s health and longevity. Think of it less as an expense and more as a permanent solution to a host of potential problems.
An unsealed crawlspace is an open invitation for moisture, pests, and allergens to enter your home. This can lead to everything from high energy bills and musty smells to serious structural damage and poor indoor air quality. Encapsulation addresses the root of these issues by creating a clean, dry, and controlled environment under your house. While the initial cost is a factor, it’s important to weigh it against the significant long-term savings and peace of mind it provides. It’s about protecting your biggest asset from the ground up.
Weighing Upfront Costs vs. Long-Term Savings
Let’s talk numbers. Crawlspace encapsulation can cost anywhere from $5,000 to $15,000, depending on the size and condition of your space. While that’s a significant upfront investment, it protects you from much larger costs down the road. A damp, uncontrolled crawlspace is a breeding ground for mold, which can require expensive remediation services. It also invites wood-destroying insects and can lead to wood rot that compromises your home's structural integrity.
Beyond preventing costly repairs, encapsulation can put money back in your pocket every month. By sealing air leaks and adding insulation, you can lower your heating and cooling bills significantly. When you compare the one-time cost of encapsulation to years of high utility bills and the risk of major repairs, the long-term value becomes clear.
The Hidden Costs of a "Cheap" Job
You’ve probably seen ads for encapsulation jobs that seem too good to be true, often in the $1,500 to $4,000 range. Unfortunately, they usually are. These low-cost options often just involve laying down a thin plastic sheet and sealing the vents, which is not a complete solution. A "cheap" job typically skips crucial steps like cleaning the space, treating existing mold, or installing a dehumidifier to control humidity.
This shortcut approach can actually make things worse by trapping moisture and hiding underlying issues. You end up paying for a service that doesn't solve the problem, leading to more damage and higher costs when you eventually have to get the job done right. Getting a comprehensive quote from a trusted professional ensures every aspect of your crawlspace health is addressed from the start.
What's Included in an Encapsulation Service?
So, what does a proper encapsulation service involve? It’s a multi-step process designed to completely isolate your crawlspace from the ground and outside air. A professional team will start by thoroughly cleaning the area, removing any debris, old insulation, and existing vapor barriers. They will then address any existing issues, like standing water or mold growth.
Next, all vents, gaps, and air leaks are sealed to prevent outside air from entering. A thick, durable vapor barrier, like a heavy-duty plastic sheet, is installed across the floor and up the walls, with all seams sealed. Finally, a dehumidifier is often installed to maintain a consistent, healthy humidity level. This comprehensive approach is what makes encapsulation so effective.
Telltale Signs You Need Encapsulation
How do you know if your crawlspace is a candidate for encapsulation? Your house might already be giving you clues. One of the most common signs is a persistent musty or earthy smell in your living areas, which often indicates mold or mildew growth below. You might also notice your floors feel cold or damp, especially in the winter.
Other red flags include higher-than-normal energy bills, as your HVAC system works overtime to compensate for air leaks. If anyone in your home suffers from worsening allergies or respiratory issues, poor air quality from the crawlspace could be the culprit. Of course, the most obvious signs are visible ones: take a look in your crawlspace for standing water, damp insulation, or damaged wood. You can find more information in our resource library.
DIY vs. Professional Crawlspace Encapsulation
Deciding between tackling a project yourself and calling in a pro is a classic homeowner dilemma. When it comes to crawlspace encapsulation, the stakes are pretty high. This isn't just a cosmetic update; it's a project that directly impacts your home's structural integrity and the air you breathe. While the DIY path might seem like a great way to save money, it’s important to weigh the costs, risks, and your own time before you start buying supplies. Let's break down the pros and cons of each approach so you can make the best choice for your home.
The Case for Hiring a Professional
When you see the price tag for professional encapsulation, it’s natural to wonder if you could just do it yourself. While the upfront cost for a pro is higher, think of it as an investment in your home's long-term health. Professionals bring specialized tools, high-grade materials, and the experience to do the job right the first time. More importantly, they can properly address underlying issues. If you have existing mold, simply covering it up won't solve the problem. A true professional will handle the mold removal correctly, ensuring it doesn't come back. A complete encapsulation is more than just laying down plastic; it includes cleaning the area, making repairs, and ensuring the space is properly sealed and dehumidified.
Is a DIY Approach Ever a Good Idea?
Going the DIY route can save you money on labor, but it's crucial to consider what you're trading for those savings. Crawlspace work is physically demanding, dirty, and can even be hazardous if you're dealing with mold or pests. You also need to factor in the value of your own time, as a weekend project can easily turn into weeks of work. If the installation isn't perfect, you risk trapping moisture, which can create an even worse mold problem than you started with. Even if you manage the project yourself, the costs for materials like a quality dehumidifier can add up quickly. For most homeowners, the peace of mind that comes with a professional job is well worth the cost, and you can always contact a specialist for an estimate.
Are There Any Downsides to Crawlspace Encapsulation?
Crawlspace encapsulation is a fantastic solution for many homes, but it’s smart to look at the full picture before you commit. Like any major home improvement project, it has potential drawbacks, especially if the job isn’t done correctly. Being aware of these possibilities helps you ask the right questions and ensure your investment is protected. Most of these issues are completely avoidable when you work with an experienced professional who understands the science behind creating a healthy crawlspace. Knowing what to watch for is the first step toward a successful project that truly protects your home for years to come.
The Need for Ongoing Maintenance
Think of your encapsulated crawlspace as a system, not a one-time fix. It requires some upkeep to continue performing at its best. The dehumidifier, a key component of the system, needs its filter cleaned or replaced periodically, and the collection reservoir must be emptied if it isn't plumbed to drain automatically. It's also a good idea to schedule regular inspections to check the vapor barrier for any tears or damage that could compromise the seal. This routine care ensures the system functions efficiently, preventing moisture buildup and keeping your home's air clean and healthy.
The Risk of Trapped Moisture from Poor Installation
This is perhaps the biggest risk, and it almost always comes down to improper installation. If a contractor seals the crawlspace without properly drying it out first or fails to install the vapor barrier correctly, moisture can become trapped. This creates a humid environment underneath the liner, which can lead to hidden mold growth, wood rot, and musty odors, the very issues you were trying to prevent. A professional team will always start with a thorough assessment and moisture remediation plan to ensure the space is completely dry before any sealing begins, preventing these problems from ever taking root.
Potential Issues with Crawlspace Access
Once your crawlspace is fully sealed, getting inside to access plumbing, wiring, or HVAC components can seem tricky. The continuous vapor barrier and insulation cover everything, which is great for moisture control but can be a headache if a plumber needs to fix a leaky pipe. However, a skilled installation team plans for this. Professionals will install a sealed and insulated access door or hatch that allows entry for future maintenance without breaking the encapsulation's airtight seal. When you discuss your project with a contractor, be sure to ask how they handle access for future repairs.
Related Articles
- The Importance of Crawlspace Encapsulation | Remtech Environmental
- Why Is Crawlspace Mold So Common? | Remtech Environmental
- What to Do if You Have Crawlspace Mold | Remtech Environmental
- Flood Damage Repair, Cary, NC | Remtech Environmental
- Crawlspace Mold, Raleigh, NC | Remtech Environmental
Frequently Asked Questions
Why is there such a wide price range for encapsulation? The final price tag for encapsulation is tailored to your home's specific situation, which is why you see costs vary so much. The size of your crawlspace is the starting point, but the real cost drivers are the conditions inside. A clean, dry space is on the lower end of the scale. However, if your crawlspace needs significant prep work, like removing debris, addressing standing water with a sump pump, or repairing existing wood rot, the project becomes more complex and the cost reflects that.
What happens if I just ignore my damp crawlspace? Ignoring a damp crawlspace is like ignoring a slow leak under your sink; the problem only gets worse and more expensive over time. That moisture creates the perfect environment for mold to grow, which can affect your home's air quality and your family's health. It also attracts pests and can cause the wooden structures supporting your house to rot, leading to serious foundation issues. You’ll also likely see higher energy bills as your HVAC system fights the damp, humid air.
Do I really need a dehumidifier, or is the plastic barrier enough? This is a great question, and the answer depends on your local climate and the specific conditions in your crawlspace. While the vapor barrier is excellent at stopping moisture from the ground, it can't control humidity in the air. In a humid climate like ours in North Carolina, a dehumidifier is almost always a necessary part of the system. It works with the encapsulation to maintain a low, stable humidity level, which is the key to preventing mold growth and condensation for good.
My crawlspace already has some mold. Is it too late for encapsulation? No, it's definitely not too late; in fact, it means your crawlspace is a perfect candidate for professional help. It is critical, however, that the mold is properly and safely removed before any encapsulation work begins. Simply covering mold with a plastic liner is dangerous, as it traps the mold and allows it to continue growing unseen. A reputable company will always perform thorough mold remediation first, ensuring the space is clean and safe before sealing it.
How long does the installation process usually take? For an average-sized home with moderate conditions, a full professional encapsulation can typically be completed in two to three days. The first day often involves cleaning the space, making any necessary repairs, and sealing air leaks. The second day is usually focused on installing the vapor barrier and any equipment, like a dehumidifier. If your project requires extensive work like mold remediation or drainage system installation, it could take a bit longer, but your contractor will give you a clear timeline upfront.