The air under your house doesn't stay put. It rises up into your living areas, carrying whatever is down there with it. In a humid climate like ours in North Carolina, that often means musty odors, dampness, and the perfect conditions for mold. A crawlspace dehumidifier is the most effective tool for stopping this cycle, but it only works if it's set up correctly. A successful crawlspace dehumidifier installation is about more than just plugging in a machine; it's about creating a controlled environment to protect your home's structure and your family's health. This guide will walk you through everything you need to know, from choosing the right unit to preparing the space and ensuring it runs efficiently for years.
Key Takeaways
- A Dehumidifier Is Your Best Defense Against Moisture: It actively prevents the damp conditions that lead to costly structural damage, pest problems, and unhealthy mold growth, protecting both your property and your family.
- Proper Placement and Features Are Crucial: For your dehumidifier to work effectively, choose a model with a condensate pump for hassle-free drainage and place it in a central, elevated location to ensure even air circulation throughout the entire crawlspace.
- Prepare Your Crawlspace for Best Results: A dehumidifier is most effective in a controlled environment, so before installation, you must address any water leaks, seal outside vents, and install a vapor barrier to stop ground moisture from entering the space.
Why You Need a Crawlspace Dehumidifier
Let's talk about what’s happening under your house. It’s easy to forget about the crawlspace, but the air down there doesn't stay put. Through a process called the "stack effect," air from your crawlspace is pulled up into your living areas, bringing with it whatever is lurking below. So, if your crawlspace is damp and musty, that’s the air you and your family are breathing day in and day out. In a humid climate like ours here in North Carolina, excess moisture in a crawlspace is less of an "if" and more of a "when," making proactive measures essential.
A crawlspace dehumidifier is your first line of defense against this hidden threat. It works around the clock to pull gallons of excess moisture out of the air, keeping the environment under your home dry and stable. This isn't just about getting rid of a musty smell; it's about protecting your home's structural integrity and your family's health. Ignoring high humidity can lead to a cascade of problems, from warped floors and pest infestations to serious mold growth that can be costly to remove. By controlling the humidity, you create an environment where mold can't thrive, wood doesn't rot, and pests aren't welcome. Think of it as a crucial investment in your home's longevity and your family's peace of mind.
Signs of High Humidity in Your Crawlspace
You don’t have to be an expert to spot the red flags of a damp crawlspace. Often, your own senses will tell you something is wrong. Do you notice a persistent musty or earthy smell inside your home that you can’t seem to track down? That’s a classic sign. Other clues include feeling dampness or seeing condensation on pipes and ductwork in the crawlspace. You might also notice peeling paint on the exterior of your home, warped wooden floors, or doors that suddenly stick. If you venture into the crawlspace, look for dark stains on the wood or visible fuzzy patches, which could be mold growth. These are all signals that your crawlspace has too much moisture.
What Happens if You Don't Address It?
Ignoring high humidity in your crawlspace is a recipe for expensive and unhealthy problems. That excess moisture creates the perfect breeding ground for mold and mildew, which can release spores into your air and trigger allergies or respiratory issues. The dampness also attracts pests like termites, cockroaches, and rodents who are looking for a water source. Over time, the constant moisture will cause wood rot, compromising the wooden beams and floor joists that support your entire home. This structural damage isn't just a minor repair; it can be a major, costly project. Addressing humidity early is the best way to protect both your property and your family’s well-being.
How to Choose the Right Crawlspace Dehumidifier
Picking the right dehumidifier for your crawlspace can feel like a big decision, but it doesn't have to be complicated. When you know what to look for, you can confidently choose a unit that will protect your home from moisture damage for years to come. It really comes down to four key things: finding the right size for your space, focusing on features that actually make a difference, understanding energy use, and weighing the price against long-term performance. Let's walk through each one so you can find the perfect fit.
Find the Right Size for Your Space
The first step is to match the dehumidifier's capacity to your crawlspace's square footage. It’s key to pick a dehumidifier that's the right size for the area. If the unit is too small, it will run constantly without ever getting the humidity down to a safe level. If it’s too large, you’re spending more than you need to. For a typical 1,500-square-foot crawlspace, you might not need the most expensive commercial-grade model; a high-quality residential unit could be perfectly effective. Before you start shopping, measure your crawlspace so you know exactly what size you’re working with. This simple step ensures you invest in a machine that can properly handle the job and prevent future mold growth.
What Features Actually Matter?
When you’re comparing models, it’s easy to get lost in a long list of features. For a crawlspace, only a few truly matter. First, look for a dehumidifier with a built-in condensate pump. This feature automatically sends the collected water out of the crawlspace through a small hose, so you never have to worry about emptying a heavy water tank. Another game-changer is Wi-Fi connectivity. A Wi-Fi-enabled model lets you check the humidity levels and confirm the unit is running from an app on your phone. This saves you from having to crawl under the house just to see if everything is working correctly. If you have questions about which features are best for your home, our team is always here to offer advice.
Understanding Energy Efficiency and Star Ratings
A crawlspace dehumidifier is designed to run for long periods, so its energy consumption is an important factor. These units use a good amount of electricity, so you’ll want to choose an efficient model to keep your utility bills in check. Look for an ENERGY STAR certified dehumidifier. These models are designed to remove the same amount of moisture as standard units but use significantly less energy. While an ENERGY STAR model might have a slightly higher price tag upfront, the savings on your electricity bill can help it pay for itself over time. It’s a smart investment that lowers your home’s running costs while protecting its structural health.
Comparing Price vs. Performance
It’s true that a quality crawlspace dehumidifier is an investment. A professional-grade unit can cost between $800 and $2,500, with installation adding a few hundred dollars more. While that might seem like a lot, it’s important to think about the alternative. Paying for a dehumidifier now can save you much more money later by helping you avoid expensive repairs from mold, wood rot, or foundation damage. Think of it as a crucial piece of home maintenance that protects your property value and prevents far bigger headaches down the road. Investing in the right equipment is a key part of a healthy home, and you can find more information in our resource library.
How to Prepare for Installation Day
A successful dehumidifier installation is all about the prep work. Before you even think about plugging in your new unit, taking a few key steps will ensure it runs efficiently and effectively from day one. Think of it as setting the stage for a healthier home. A little effort now prevents major issues down the road and helps your dehumidifier do its job without fighting against existing problems like leaks or open vents. If you skip this stage, you might end up with a dehumidifier that runs constantly, struggles to lower the humidity, or fails to prevent the very issues you bought it to solve, like musty odors and mold growth. Getting your crawlspace ready involves more than just clearing out a spot for the machine; it’s about creating a controlled environment where your dehumidifier can truly shine. From clearing out debris to addressing hidden moisture sources, each step builds on the last. This preparation ensures that when you finally switch your dehumidifier on, it’s working in optimal conditions to protect your home’s foundation and improve your indoor air quality. Let’s walk through exactly what you need to do to prepare for installation day.
Inspect and Clear Out the Crawlspace
First things first, you need a clean slate. Before you can properly assess the situation, you’ll have to completely clear out your crawlspace. Remove any items you have stored down there, along with any old construction debris, trash, or organic material like wood scraps. This gives you a clear view of the entire area, making it easier to spot potential problems like leaks, pests, or mold. A clean space is also a safer space to work in. You’ll have room to move around, lay down a vapor barrier, and position the dehumidifier without tripping over clutter. It’s a simple but essential first step for a smooth installation.
Address Any Water Issues First
A dehumidifier is designed to pull moisture from the air, not to pump out standing water. Before you install your unit, it’s critical to find and fix any sources of active water intrusion. Inspect the area for plumbing leaks, groundwater seeping through the foundation walls, or poor exterior drainage that’s sending water into your crawlspace. If you see puddles, damp spots on the walls, or dripping pipes, those problems need to be solved first. Installing a dehumidifier while you still have an active leak is a losing battle. If you’re dealing with significant water issues, professional water damage restoration can address the root cause and properly dry the area.
Why You Should Check for Mold Before Starting
Where there’s chronic moisture, there’s often mold. Since high humidity is the perfect breeding ground for mold, you need to perform a thorough check before sealing up your crawlspace. Look for fuzzy patches, discoloration on wooden joists, or musty smells. A dehumidifier is great for preventing future mold growth by controlling moisture, but it won’t do anything about existing colonies. Sealing up a crawlspace with mold already in it can trap the spores and allow the problem to worsen, potentially affecting your home’s structural integrity and indoor air quality. If you find anything suspicious, it’s best to schedule a professional mold removal service to handle it safely and effectively.
Seal Vents and Consider Encapsulation
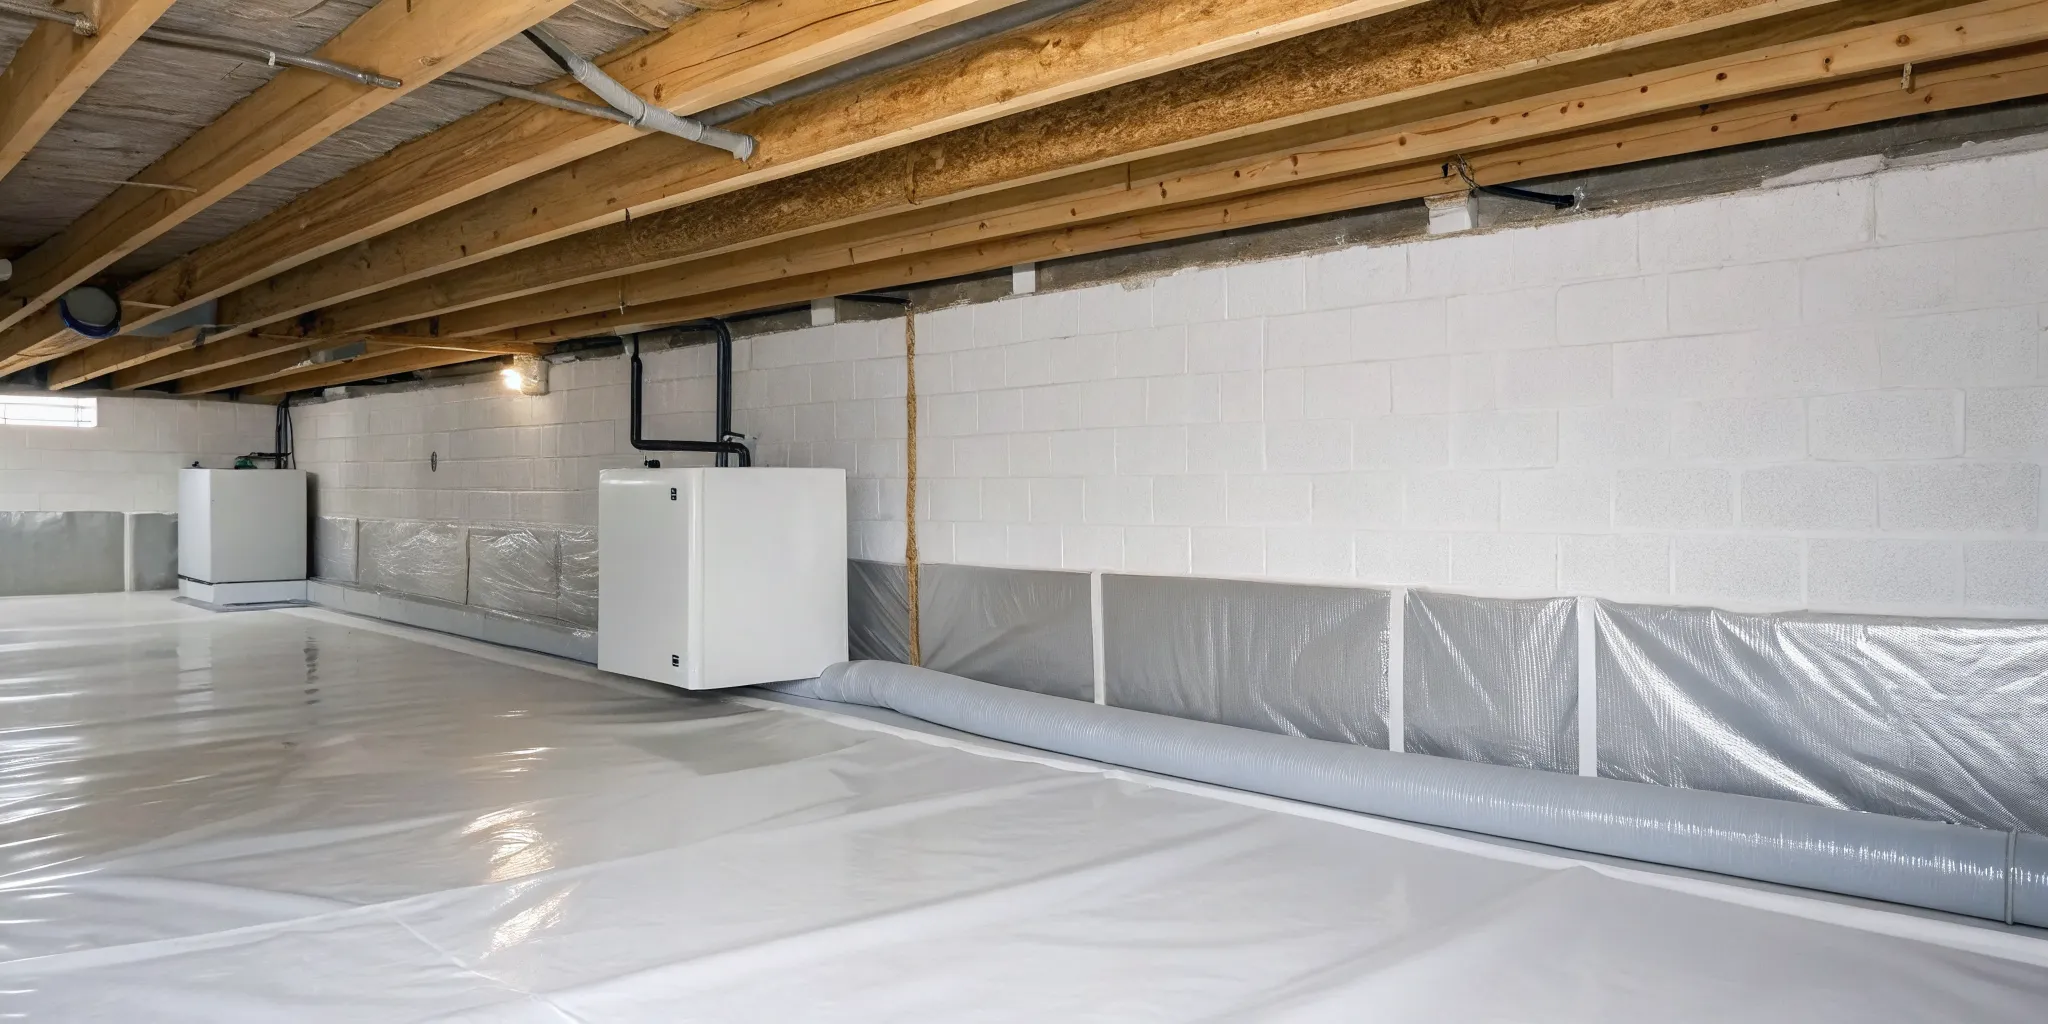
For your dehumidifier to work efficiently, it needs to operate in a closed, conditioned space. That means you’ll need to seal off any crawlspace vents that lead to the outside. Leaving them open allows humid summer air or cold winter air to flow in, forcing your dehumidifier to work overtime. You can seal vents from the inside with foam board insulation and a quality sealant. This is a key part of creating an encapsulated or semi-encapsulated crawlspace. A full encapsulation, which includes lining the floor and walls with a thick vapor barrier, is the most effective way to isolate the space from the earth and outside air, creating the ideal environment for your dehumidifier.
Gather Your Tools and Materials
Nothing slows down a project like having to stop and search for a tool. Before you head into the crawlspace, gather everything you’ll need for the installation. This ensures you can work efficiently without unnecessary interruptions. Having your tools and materials ready will make the entire process feel much more manageable.
Here’s a basic checklist to get you started:
- The dehumidifier and its user manual
- Safety glasses and work gloves
- A level to ensure the unit is properly balanced
- Drain hose and any necessary fittings
- Drill and utility knife
- Vapor barrier and sealing tape
- Staple gun or hammer and nails for securing the barrier
Where to Place Your Crawlspace Dehumidifier
You’ve done the hard work of choosing the right dehumidifier, and now you’re ready to put it to work. But before you do, let’s talk about location. Where you place your crawlspace dehumidifier is just as important as the model you choose. The right spot ensures the unit runs efficiently, effectively controls moisture throughout the entire space, and saves you from future headaches. Think of it like placing a speaker in a room; you want it positioned to fill the whole space with sound. Similarly, your dehumidifier needs to be placed where it can circulate air and pull moisture from every corner. Getting this right from the start will make all the difference in protecting your home’s foundation and air quality.
A poorly placed unit might run constantly without ever getting the humidity under control, or it might only dry out one small section of the crawlspace, leaving other areas vulnerable to moisture damage. This can lead to musty odors, wood rot, and even pest infestations. By taking a few minutes to think strategically about placement, you’re setting yourself up for success and ensuring your investment pays off. It’s about working smarter, not harder, to keep the environment under your home healthy and dry. We'll walk through the three key rules for perfect placement to make sure your dehumidifier does its job right from day one.
Keep a Safe Distance from Walls
One of the most common mistakes is placing the dehumidifier too close to an exterior wall. It might seem convenient, but it forces the machine to work overtime. Your goal is to dry out the air inside the crawlspace, not pull in an endless supply of humid air from outdoors. As a rule of thumb, keep the unit’s air intake at least ten feet away from any foundation walls. This simple step prevents it from constantly battling outside humidity, which makes it run more efficiently and saves on energy costs. Giving it space also improves overall airflow, allowing it to better circulate and treat the air already under your home, which is key to preventing the damp conditions that can lead to mold growth.
Find a Central, Elevated Position
The ideal spot for your dehumidifier is near the middle of your crawlspace. Central placement allows the unit to draw in moist air and distribute dry air evenly, ensuring no corner is left damp. Never place the unit directly on the dirt floor. At a minimum, it should sit on top of your vapor barrier. For even better results, elevate the unit on a few cinder blocks. This slight lift helps protect it from any potential water puddles and can also assist with gravity-fed drainage. Just make sure the unit is level and stable. Remember to leave plenty of open space around the dehumidifier so air can flow freely into the intake and out of the exhaust. You can find more helpful tips like this in our resource library.
Plan for Easy Maintenance Access
Your crawlspace dehumidifier is not a "set it and forget it" appliance. To keep it running effectively for years, you’ll need to perform regular maintenance, like cleaning the air filter and inspecting the drain line. This is where a little foresight goes a long way. When choosing a location, imagine having to access it a few times a year. Make sure you can easily reach the unit without having to perform gymnastics in a tight space. Placing it in an accessible area makes routine upkeep a simple task rather than a dreaded chore. If the thought of crawling under your house for maintenance sounds like a job you’d rather skip, our team is always here to lend a hand.
Your Step-by-Step Installation Guide
Alright, you’ve done your research and picked out the perfect dehumidifier. Now it’s time to get it installed. While this can be a great DIY project, it’s important to follow each step carefully to make sure your unit works effectively and safely. A proper installation is your first line of defense against the damp, musty conditions that can lead to bigger problems. Getting it right from the start helps prevent the excess moisture that can cause structural damage and encourage mold growth.
This guide breaks the process down into five clear steps. We’ll walk through everything from preparing the ground with a vapor barrier to setting the final humidity levels. Before you begin, make sure you have read the manufacturer’s instructions for your specific model, as there might be unique requirements. Taking your time here will pay off in the long run with a healthier, drier crawlspace and better peace of mind. Let’s get started.
Step 1: Lay Down a Vapor Barrier
First things first, you need to address the biggest source of moisture in most crawlspaces: the ground itself. A vapor barrier, which is a thick sheet of plastic, is essential for stopping moisture from the soil from seeping up into the space. Start by clearing the crawlspace floor of any sharp rocks or debris. Then, roll out the plastic sheeting to cover the entire ground area. You’ll want to run the plastic about six inches up the crawlspace walls and overlap any seams by at least a foot to create a continuous barrier. Use sealing tape on all seams to ensure a tight seal.
Step 2: Position and Level the Unit
Where you place your dehumidifier matters. Find a spot that is as central as possible to allow for even air circulation throughout the entire crawlspace. It’s also important to leave at least a foot of clearance on all sides of the unit so it can pull in air effectively. The surface should be flat and stable. Most crawlspace dehumidifiers have adjustable feet to help you get the unit perfectly level. This is crucial for making sure the internal components and the drainage system work correctly. An unlevel unit can lead to water pooling and operational issues down the road.
Step 3: Set Up the Drainage System
Your dehumidifier will pull a lot of water out of the air, and that water needs a place to go. You have two main options for drainage. If you have a floor drain or a sump pump nearby, you can use gravity. Simply attach the provided drain hose to the unit and run it downhill to the drain. If a gravity-fed drain isn't an option, you’ll need a dehumidifier with a built-in condensate pump. This pump will automatically push the water through the hose to a drain or even outside. Make sure the drain line is secure and free of kinks to prevent clogs and potential water damage.
Step 4: Connect to Power and Adjust Settings
Now it’s time to bring your dehumidifier to life. For safety, always plug the unit directly into a GFCI (ground-fault circuit interrupter) protected outlet. It’s very important to avoid using extension cords, as they are not designed for the continuous power draw of a dehumidifier and can create a fire hazard. Once the unit is plugged in, turn it on. Most models will have a control panel where you can begin to adjust the settings. Refer to your owner’s manual to understand the different modes and features your specific unit offers before moving on to the final step.
Step 5: Set Your Target Humidity Level
The final step is to tell your dehumidifier what to do. You’ll want to set the target humidity level, or RH (relative humidity), to somewhere between 30% and 50%. This range is ideal for preventing mold growth and protecting the wooden structures in your crawlspace. It may take several hours or even a day for the unit to bring the humidity down to the target level, especially if the crawlspace was very damp to begin with. If you find the humidity isn't dropping after a few days, it may signal a larger issue that requires a professional eye, so don't hesitate to contact an expert for an assessment.
What Are the Best Drainage Options?
A dehumidifier works by pulling moisture out of the air, but all that collected water has to go somewhere. Choosing the right drainage method is key to a set-it-and-forget-it system that you don’t have to constantly monitor or empty. The best option for your crawlspace depends entirely on its layout, elevation, and whether you have existing drains like a sump pump. If water isn't drained properly, it can pool and create the exact kind of damp environment you're trying to fix. This standing water can saturate building materials and lead to potential mold growth, which defeats the whole purpose of installing the dehumidifier in the first place.
Before you install your unit, take a look around your crawlspace. Is there a floor drain? Where is it in relation to where you want to place the dehumidifier? Is it higher or lower? Answering these questions will help you decide between the three main drainage setups: using gravity, installing a condensate pump, or tying into an existing drain line. Each has its own benefits, and one is likely a perfect fit for your home’s specific needs. Getting this part right from the start saves you from future headaches, potential water damage, and the hassle of constantly checking on your system. Let's walk through what each one involves so you can make the right choice for a dry and healthy crawlspace.
Using Gravity Drainage
Gravity drainage is the simplest and most straightforward method, as long as your crawlspace layout cooperates. This approach works if you can place your dehumidifier higher than your intended drain point. Common drain points include a floor drain, a French drain system, or a sump pump basin. You simply attach a hose to the dehumidifier’s drain port and run it downhill to the drain.
Since this method relies entirely on gravity, you need to ensure the hose has a consistent downward slope with no kinks or low spots where water could pool. It’s a low-maintenance and cost-effective solution because it doesn’t require any extra parts or electricity. If your crawlspace already has a suitable low-lying drain, this is definitely the easiest path to take.
Installing a Condensate Pump
What if your drain is higher than your dehumidifier, or the only available drain is far away? This is where a condensate pump comes in. Many crawlspace dehumidifiers come with a built-in pump, or you can buy a small, external one that sits next to your unit. The dehumidifier drains into the pump’s reservoir, and once the water reaches a certain level, the pump automatically kicks on and pushes it out through a small tube.
This gives you much more flexibility. A condensate pump can push water vertically and horizontally, allowing you to drain it to a utility sink, a plumbing stack, or even run the line up and out of the house. It’s the perfect solution for basements or tricky crawlspace layouts where a simple gravity drain just isn’t an option.
Tying into an Existing Drain Line
Another effective option is to connect your dehumidifier’s drain hose directly to your home’s existing plumbing, like an HVAC condensate line or another suitable drain pipe. This creates a permanent, self-draining system that you’ll never have to think about. Alternatively, you can run the drain line directly outside. This often involves drilling a small hole through the rim joist (the wooden frame at the top of your foundation walls).
If you run the line outside, make sure the hose is angled downward so water flows out easily and doesn't freeze or back up into the unit. If you’re not comfortable drilling into your home’s structure or tapping into plumbing lines, this is a great time to contact a professional. They can ensure it’s done correctly without causing any unintended issues.
DIY vs. Professional Installation: Which Is for You?
Deciding whether to install your crawlspace dehumidifier yourself or hire a professional is a key part of the process. A DIY approach can certainly save you money on labor costs, and there’s a lot of satisfaction in completing a home project on your own. However, a professional installation offers peace of mind, ensuring the unit is set up for maximum efficiency and safety from day one. An improperly installed dehumidifier won’t just fail to control humidity; it could lead to water pooling, electrical issues, or even damage the unit itself. It's a choice between saving money upfront and investing in long-term assurance.
Your decision really comes down to your personal skill set, the current condition of your crawlspace, and how much time you’re willing to invest. If you’re facing a straightforward installation in a clean, accessible space, DIY might be a great option. But if you have any doubts or underlying issues like standing water or mold, calling in an expert is the wisest move. A professional can spot potential problems you might miss and ensure the entire crawlspace environment is addressed, not just the humidity. Let’s look at the factors that can help you choose the right path for your home.
When to Tackle It Yourself
If you’re comfortable with home improvement projects and have a good understanding of how things work, a DIY installation is definitely within reach. This path is best if your crawlspace is already in decent shape. For example, if the space is already sealed or encapsulated and free of major moisture problems, the job becomes much more manageable. You should feel confident handling basic tasks like positioning the unit, setting up a permanent drainage hose, and safely connecting the dehumidifier to a power source. You’ll also need to be comfortable adjusting the humidistat and fan settings to fine-tune the unit’s performance. If that sounds like a straightforward weekend project, you can save on installation fees by tackling it yourself.
When to Call in the Pros
There are many situations where calling a professional is the smartest and safest choice. If your crawlspace has a dirt floor, persistent water seepage, or visible signs of mold, a dehumidifier is only part of a larger solution. An expert can properly assess the entire space, factoring in its size, layout, and specific moisture sources to recommend the right unit and placement. They also handle the complexities of drainage and electrical work, ensuring everything is up to code. If you’re feeling unsure about any part of the installation, hiring a pro eliminates the guesswork. This is especially important if you suspect you need professional mold removal before installing any new equipment, as a healthy environment starts with a clean slate.
What to Expect from a Professional Installation
When you hire a professional, you’re investing in expertise that ensures the job is done correctly and efficiently. The process usually begins with a thorough inspection of your crawlspace. A technician will identify moisture sources, take measurements, and recommend the best dehumidifier and setup for your specific needs. While the dehumidifier unit itself can cost between $800 and $2,500, professional installation typically adds $300 to $500 to the total. During the installation, the team will position the unit, install the drainage system, and handle all the electrical connections. They can also offer comprehensive environmental solutions, like adding a vapor barrier or sump pump, to create a complete moisture control system that protects your home for years to come.
How to Maintain Your Dehumidifier
Once your crawlspace dehumidifier is installed, you can’t just set it and forget it. Think of it like any other important appliance in your home; a little regular maintenance goes a long way in keeping it running efficiently and effectively. Consistent upkeep ensures your unit has a long lifespan and continues to protect your crawlspace from excess moisture. Neglecting it can lead to decreased performance, higher energy bills, and even a return of the damp, musty conditions you worked so hard to eliminate.
Thankfully, maintaining your dehumidifier is straightforward. Most of the tasks are simple checks and cleanings you can easily do yourself in just a few minutes every month or so. By regularly cleaning the filter, checking the drain line, and keeping an eye on performance, you can prevent small issues from becoming big, expensive problems. This proactive approach is the best way to protect your investment and ensure your home’s air remains healthy and free from the threat of mold growth. Following these simple steps will keep your unit in top shape for years to come.
Clean the Air Filter Regularly
The air filter is your dehumidifier’s first line of defense, trapping dust, dirt, and other airborne particles. Over time, it can become clogged, which forces the unit to work much harder to pull in air. This not only reduces its efficiency but can also strain the motor and shorten its lifespan. To keep your unit performing at its best, make it a habit to check the filter every month. Some filters are disposable and need to be replaced, while many are reusable and can be washed with mild soap and water. Just be sure to let it dry completely before putting it back in. A clean filter ensures maximum airflow and helps maintain the air quality in your crawlspace.
Inspect and Clear the Drain Line
Your dehumidifier pulls a lot of water out of the air, and the drain line is what carries it safely away. If this line gets clogged with sludge or debris, the water can back up and overflow, creating the very puddles and dampness you’re trying to prevent. Every few months, take a moment to inspect the drain line. Make sure it isn’t kinked, blocked, or leaking. If you notice it’s draining slowly, you can often clear minor blockages by flushing the line with a solution of water and white vinegar. This simple check is crucial for preventing water damage and ensuring your unit can dispose of the moisture it collects.
Wipe Down Coils to Remove Buildup
Over time, the evaporator and condenser coils inside your dehumidifier can accumulate a layer of dust and grime. This buildup acts like a blanket, insulating the coils and making it harder for them to pull moisture from the air. To maintain efficiency, it’s a good idea to clean the coils about once a year. First, always unplug the unit for safety. Then, following your manufacturer’s instructions, gently wipe away any visible buildup with a soft cloth or brush. Keeping the coils clean helps your dehumidifier run more effectively and use less energy, saving you money while protecting your home.
Use a Hygrometer to Monitor Humidity
A hygrometer is a small, inexpensive device that measures the relative humidity in the air. Placing one in your crawlspace is a great way to confirm your dehumidifier is doing its job. Your goal is to maintain a humidity level between 30% and 50%, which is ideal for preventing mold growth and rot. Since outdoor humidity levels change with the seasons, you may need to adjust your dehumidifier’s settings accordingly. Using a hygrometer allows you to verify that your target humidity is being met and helps you fine-tune your settings for optimal performance and energy efficiency. It’s a simple tool that gives you valuable peace of mind.
Know the Warning Signs and When to Get Help
Even with perfect maintenance, you might occasionally run into issues. It’s important to know what to look for so you can address problems before they get worse. If you notice the humidity levels are creeping back up, the unit isn’t collecting water, or it’s making unusual noises, it’s time to investigate. Your user manual is a great first resource for troubleshooting common problems. However, if the issue persists or you suspect a more serious problem with moisture in your crawlspace, it’s best to call in the experts. Don’t hesitate to contact a professional who can diagnose the problem correctly and ensure your home remains safe and dry.
Is a Dehumidifier Enough on Its Own?
Think of a crawlspace dehumidifier as the star player on a team. It’s incredibly effective, but it can’t win the game alone. While a dehumidifier is an essential tool for managing moisture, it’s most effective as part of a complete system. To truly protect your home from humidity, mold growth, and structural damage, you need to support your dehumidifier with a few other key elements. Relying on the appliance by itself is like trying to bail out a boat with a hole in it; you’re working hard, but you aren’t addressing the root of the problem. A comprehensive approach is the only way to ensure your crawlspace stays dry and healthy for the long haul.
The Importance of a Vapor Barrier
A vapor barrier is a non-negotiable partner for your dehumidifier. Much of the moisture in a crawlspace seeps up directly from the ground. A thick plastic vapor barrier laid across the entire floor of the crawlspace stops this soil moisture in its tracks. Without one, your dehumidifier is forced to run constantly, fighting an endless battle against a continuous source of humidity. This not only wears out your appliance faster but also drives up your energy bills. Installing a vapor barrier first gives your dehumidifier a huge head start, allowing it to focus on managing the moisture in the air, not the entire water table beneath your home.
Do You Also Need a Drainage System?
Your dehumidifier will pull gallons of water from the air, and all that water has to go somewhere. Planning for drainage is a critical step you can't skip. The easiest method is using a simple hose to let gravity drain the water to a lower point, like a floor drain or a sump pump basin. However, if your drain is higher than the dehumidifier, you’ll need a unit with a built-in condensate pump. This pump automatically pushes the water up and out through a hose. Improper drainage can lead to pooling water, creating the very moisture and water damage issues you’re trying to prevent.
Why Regular Mold Inspections Are Key
Even with a great setup, your crawlspace isn't a "set it and forget it" part of your home. High humidity can cause wood to rot, attract pests, and damage your home's foundation over time. Most importantly, lingering moisture is the perfect recipe for mold growth, which can pose serious risks to your family's health. A dehumidifier and vapor barrier dramatically reduce this risk, but regular inspections are your best defense for catching problems early. Getting a professional mold removal expert to check the area periodically ensures that hidden issues don't turn into major, costly repairs down the road.
Related Articles
- The Importance of Crawlspace Encapsulation
- Why Is Crawlspace Mold So Common?
- What to Do if You Have Crawlspace Mold
- Crawlspace Mold, Durham, NC
- Crawlspace Mold, Raleigh, NC
Frequently Asked Questions
Can I just use a regular room dehumidifier in my crawlspace? That’s a common question, and I understand wanting to use what you might already have. However, a standard room dehumidifier just isn't built for the job. Crawlspaces are often dusty and have fluctuating temperatures, which can quickly wear out a typical household unit. More importantly, room dehumidifiers have small water tanks that you would have to empty constantly, and crawling under your house every day is not a task anyone wants. A proper crawlspace dehumidifier is designed for that tough environment, can operate in cooler temperatures, and has an automatic drainage system so you never have to empty a bucket.
How long will it take for the dehumidifier to make a difference? This depends on how damp your crawlspace is when you start. If it's very humid, it might take the dehumidifier a full day or even a few days of continuous operation to bring the relative humidity down to the target level of around 50%. You’ll know it’s working when the musty smell in your home starts to disappear and the air feels less heavy. Be patient in the beginning; once the unit gets the initial moisture under control, it will only need to cycle on and off to maintain that healthy level.
My crawlspace is already encapsulated. Do I still need a dehumidifier? Encapsulation is an excellent step for controlling moisture, but it works best as part of a team. While the vapor barrier does a great job of stopping moisture from seeping in from the ground and walls, some humidity can still find its way in or be trapped during the sealing process. A dehumidifier works with your encapsulation to actively pull that remaining moisture out of the air. Together, they create a completely controlled environment, giving you the ultimate protection against mold and moisture damage.
Is running a dehumidifier all the time going to make my electricity bill skyrocket? It's smart to think about the running costs. A crawlspace dehumidifier will add to your electricity bill, but it’s more of a predictable, manageable expense than a shocking increase. Choosing an ENERGY STAR certified model makes a big difference in efficiency. It's helpful to frame it as an investment. The monthly cost to run the unit is minor compared to the thousands of dollars you could spend on repairing structural wood rot or paying for a major mold remediation project down the line.
What should I do if I find what looks like mold while preparing my crawlspace? If you see something you suspect is mold, the best thing to do is stop what you are doing and leave the area. Trying to clean or remove it yourself without the proper training and safety equipment can disturb the colony and release spores into the air, potentially making the problem worse or affecting the air inside your home. This is the point where you should call a professional. An expert can safely assess the situation and recommend the correct steps for removal, ensuring your crawlspace is truly clean before you seal it up.