That musty smell in the air and the dark, creeping stain on the wall are more than just an eyesore; they’re signs of a deeper problem. Mold is a symptom, and the root cause is almost always moisture. Whether it’s from a slow leak, poor ventilation in a steamy bathroom, or condensation on a cold wall, that dampness is what invites mold into your home. Simply cleaning the surface without fixing the water source is like pulling a weed without getting the root—it’s guaranteed to grow back. This guide will help you play detective to find the source of the moisture. Before you can learn how to get rid of mould on walls permanently, you first have to understand what’s causing it.
Key Takeaways
- Focus on the source, not just the stain: Mold is a direct result of excess moisture. To solve the problem permanently, you must first find and fix the water source, such as a leak, high humidity, or condensation, before you even begin to clean.
- Work safely and choose the right tools for small jobs: Always protect yourself with an N-95 mask, gloves, and goggles. For porous surfaces like drywall, skip the bleach and use white vinegar instead; it effectively kills mold at the root rather than just whitening the surface stain.
- Recognize when to call a professional: DIY methods are only for small, contained areas. If the mold covers more than 10 square feet, you suspect it's hidden behind walls, or you're experiencing health symptoms, it's time to contact a certified remediation specialist for safe and thorough removal.
How to Spot Mold on Your Walls
Finding mold in your home can feel overwhelming, but catching it early is the best way to stop it from becoming a bigger problem. Your senses are your best tools for detection. Mold often gives itself away through visible signs, a distinct smell, or even how you feel physically. Knowing what to look for is the first step toward a healthy, clean space. Let’s walk through the key indicators that you might have a mold issue on your hands.
What to Look For: Visual Signs of Mold
The most obvious sign of mold is seeing it. Look for discoloration on your walls, which can show up as black, green, or even white patches. These spots might look fuzzy, slimy, or just like a stubborn stain. Pay close attention to areas with high moisture, like bathrooms, kitchens, and basements. Don't forget to check less obvious places, such as behind furniture or under sinks. If you notice peeling paint or warped walls, it could be a sign of hidden moisture that’s creating a perfect home for mold. If you find a large area of growth, it's wise to consider professional mold removal to ensure it's handled safely.
That Musty Smell: A Clear Warning Sign
Sometimes you can smell mold before you can see it. If you notice a persistent musty or earthy odor, trust your nose. People often describe the smell as being similar to damp soil or wet cardboard. This smell is caused by gases produced by mold as it grows. The odor can be stronger in enclosed spaces like closets or basements. If you notice a musty smell that gets worse in a specific area, it’s a strong indicator that mold is hiding somewhere nearby, possibly behind drywall or under flooring. Don't just cover it up with air fresheners; investigate the source.
Health Symptoms of Mold Exposure
Your body can also alert you to a mold problem. For some people, exposure to mold spores can trigger allergy-like symptoms. You might experience a stuffy nose, coughing, throat irritation, or itchy, watery eyes. In other cases, it can cause skin rashes. If you find that these symptoms seem to flare up when you're at home but get better when you go out, it could be a sign that your indoor air quality is compromised. While these symptoms can be caused by many things, their connection to your environment is a clue worth paying attention to. If you have persistent symptoms and suspect mold, it's a good idea to get in touch with a professional for an inspection.
What Causes Mold to Grow on Walls?
Finding mold on your walls can feel like a personal failure, but it’s a surprisingly common problem with clear causes. Mold isn’t just a random occurrence; it’s a living organism that needs specific conditions to thrive. The good news is that once you understand what it needs, you can take steps to make your home less hospitable to it.
Think of mold spores as tiny seeds that are always floating in the air. They’re harmless until they land on a surface that has everything they need to grow: moisture, a food source (like drywall or wood), and the right temperature. The single most important factor, and the one you have the most control over, is moisture. Let’s break down the three main reasons you might be finding damp spots that invite mold into your home.
Moisture, Humidity, and Leaks
Moisture is mold’s best friend. Without it, mold simply can’t grow. This is why the first step in any mold issue is to play detective and find the source of the water. It could be an obvious culprit, like a dripping pipe under the sink or a slow leak in the roof that shows up after a storm. Or, it could be less apparent, like consistently high humidity in a bathroom with no window. Simply scrubbing the mold off the wall won't solve the problem for good if the underlying dampness remains. You have to fix the source of the moisture, or the mold will always come back. If you've fixed a leak but are left with a persistent mold problem, professional mold removal is the best way to ensure it's gone for good.
Poor Ventilation and Airflow
Have you ever noticed mold growing in a stuffy corner or behind a big piece of furniture? That’s usually a sign of poor ventilation. When air can’t circulate freely, any moisture in the air gets trapped, creating a humid microclimate that mold loves. This is especially common in bathrooms after a hot shower, in kitchens while cooking, or in closets packed with clothes. Pushing furniture like bookcases or dressers flush against an exterior wall can also trap damp air, leading to hidden mold growth. Improving airflow can be as simple as cracking a window, running an exhaust fan, or using a small fan to keep the air moving in stagnant areas. It’s a small change that makes a big difference.
Condensation on Cold Surfaces
Condensation is another major source of moisture that often goes unnoticed. It happens when warm, humid air inside your home comes into contact with a colder surface, causing water droplets to form. Think of the way a glass of ice water "sweats" on a summer day; the same thing happens on your walls. This is most common on exterior walls that aren't well-insulated, around window frames, or on pipes. You might see it as a fine mist or small droplets on the wall, especially during colder months. Over time, this consistent dampness is more than enough to support a thriving mold colony. If you suspect condensation is the issue, you may need to look into improving your home's insulation or contact a professional to assess the situation.
Essential Safety for DIY Mold Removal
Before you even think about scrubbing, let's talk about safety. Tackling a mold problem without the right precautions can expose you to airborne spores and harsh chemicals, potentially making the situation worse for your home and your health. Getting this part right is not optional. It involves wearing the proper gear, ensuring the room is well-ventilated, and knowing which cleaning agents you should never, ever mix. These steps are fundamental to protecting yourself during the cleanup process.
If you’re dealing with a small, contained area of mold (generally less than 10 square feet), a DIY approach can work. But your safety should always come first. If reading through these steps makes you feel uneasy, or if you're dealing with a larger infestation, it's always best to get help from a professional mold removal team. We have the specialized equipment and training to handle the job safely and effectively, protecting you and your family from unnecessary risks. Remember, some mold issues are simply too big or too complex for a weekend project, and there's no shame in calling for backup when your health is on the line.
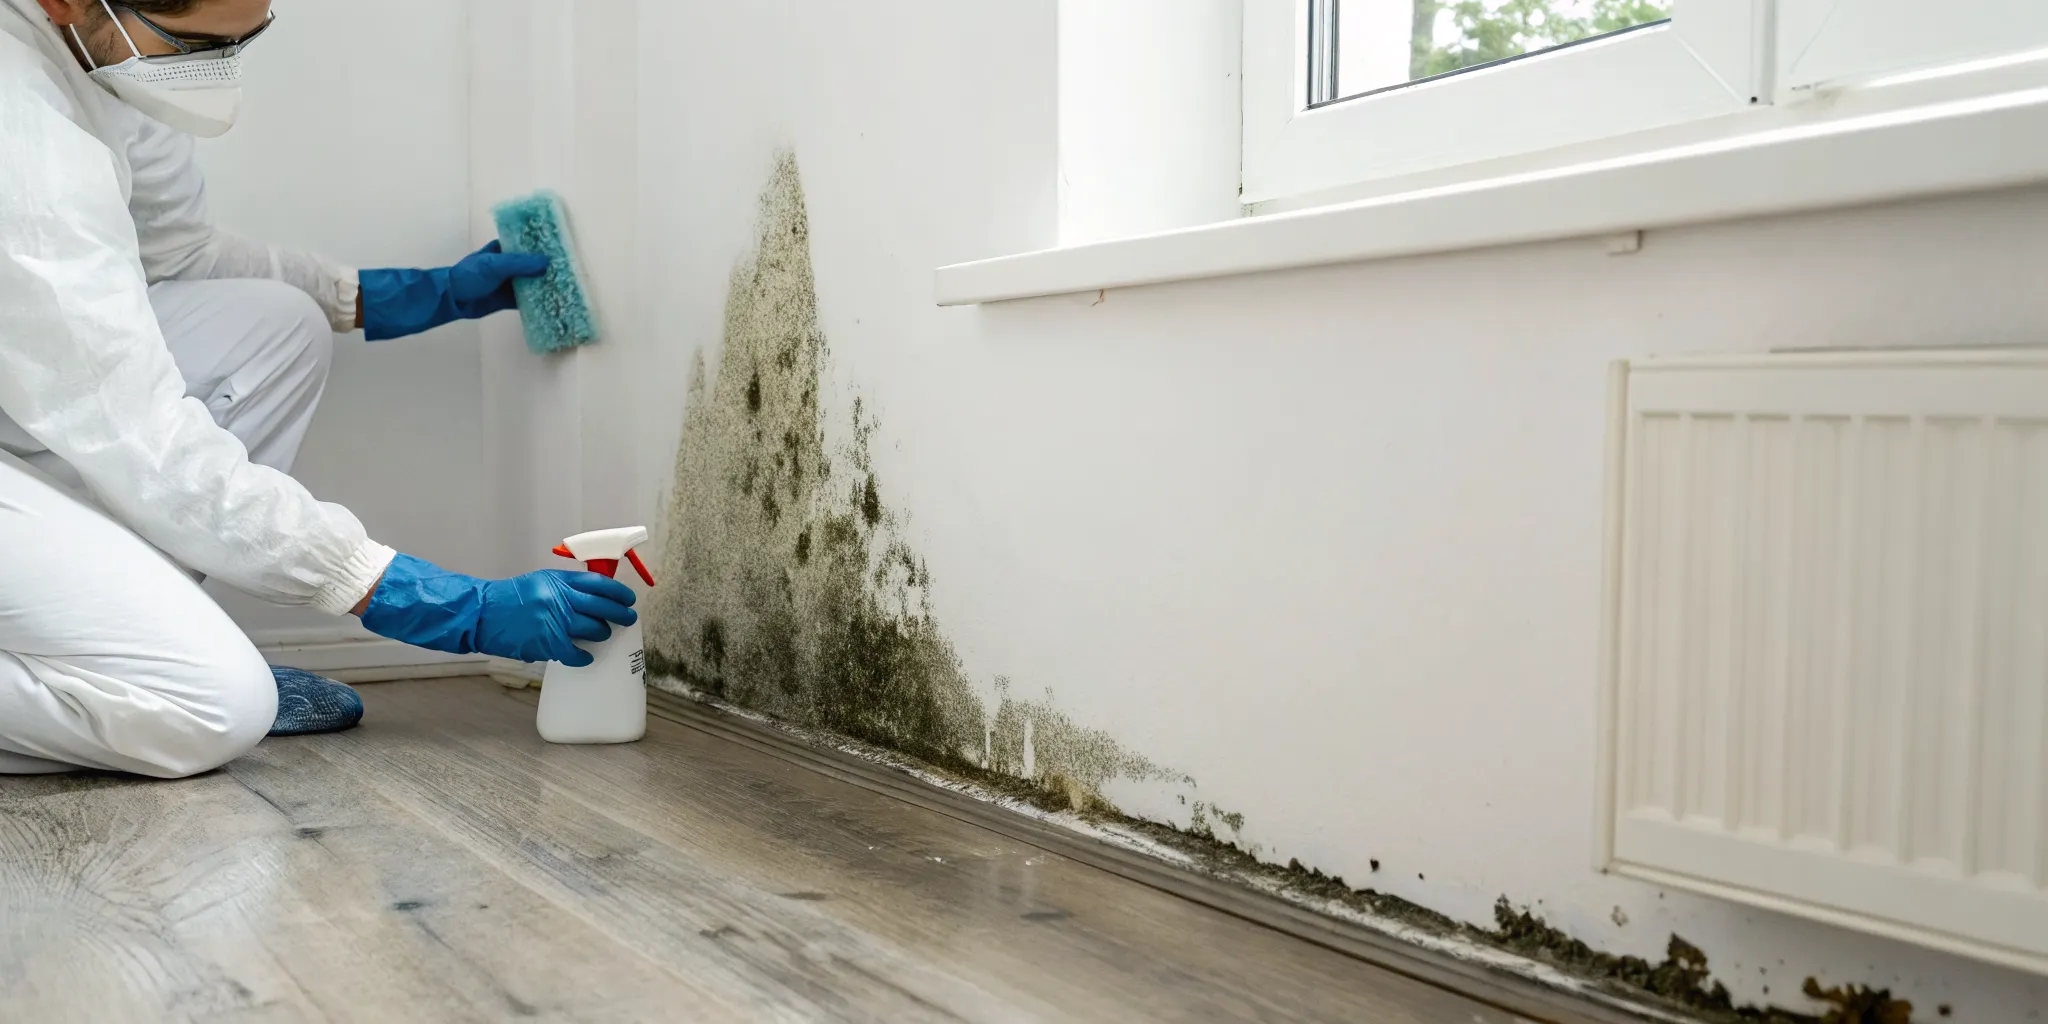
The Right Personal Protective Equipment (PPE)
This is non-negotiable. Mold spores are tiny and can easily be inhaled or irritate your skin and eyes. To protect yourself, you need a specific set of gear. Start with an N-95 respirator mask to filter out airborne particles; simple dust masks won't cut it. Next, protect your eyes with safety goggles that create a seal around your face. Finally, wear long, non-porous gloves (like rubber or neoprene) to keep mold and cleaners off your skin. It’s also a good idea to wear old clothing that you can either wash immediately in hot water or simply throw away after you’re done.
Why Proper Ventilation is Crucial
When you start cleaning, you will disturb the mold, sending spores flying into the air. Without proper ventilation, those spores can spread to other parts of your home or simply settle back onto the surfaces you just cleaned. Before you start, open any windows in the room and place a fan pointing out the window. This helps pull the contaminated air outside. If possible, seal off the doorway to the rest of the house with plastic sheeting and tape to contain the work area. Good airflow also helps dissipate any strong fumes from your cleaning solution, making the space safer to work in.
The Dangers of Mixing Cleaners
You might think that combining two cleaners will create a super-powered solution, but it can actually create a serious hazard. The most important rule is to never mix bleach with ammonia or vinegar. Mixing bleach and vinegar, for example, produces toxic chlorine gas, which can cause severe respiratory damage and chemical burns. It’s best to stick to one cleaning product for the job. Always read the labels on your products and follow the manufacturer's instructions carefully. Your goal is to remove the mold, not create a dangerous science experiment in your home.
The Best (and Worst) Cleaners for Mold
When you find mold on your walls, your first instinct is probably to grab the strongest cleaner you have. But not all cleaning products are created equal when it comes to mold, and some can even make the problem worse. Choosing the right cleaner is about more than just removing a stain; it’s about safely eliminating the fungus and preventing it from returning. The effectiveness of a cleaner depends entirely on the surface you’re treating—what works on bathroom tile won’t necessarily work on porous drywall.
Before you start scrubbing, it’s important to understand the difference between cleaners that just remove the surface appearance of mold and those that actually kill it at the root. Using the wrong product can leave the underlying problem intact, leading to a quick and frustrating regrowth. This is especially true for common household cleaners that aren't designed for deep remediation. In this section, we’ll walk through the best (and worst) options, from simple household solutions to commercial products, so you can tackle the job correctly and safely. This knowledge is your first line of defense in creating a healthier environment for you and your family.
Natural Solutions: Vinegar and Baking Soda
You might be surprised to learn that one of the most effective mold fighters is likely already in your pantry: white vinegar. Unlike bleach, which only kills surface mold, vinegar’s acidity allows it to penetrate porous materials like drywall and wood to kill the mold at its roots. For a simple and powerful solution, you can mix it with an equal part of water in a spray bottle. Some people also add a few drops of tea tree oil for extra antifungal power. Baking soda is another great natural option, perfect for scrubbing away stains and absorbing musty odors without harsh chemicals. While these DIY methods are great for small spots, widespread issues often require professional mold removal.
Commercial Mold Removers
If you prefer a store-bought solution, you’ll find plenty of commercial mold removers and mildew sprays on the market. These products are specifically formulated to kill mold spores. Another great tool for prevention is anti-mold or mold-resistant paint. These paints contain antimicrobial agents that prevent mold from growing on the surface, making them ideal for bathrooms, basements, and other damp areas. Just remember to follow the instructions carefully. Most anti-mold paints require you to completely eliminate existing mold before application; you can’t just paint over the problem and expect it to disappear for good. Proper preparation is key to making these products work effectively.
Why Bleach Often Fails
It’s a common myth that bleach is the ultimate mold killer. While it’s excellent at disinfecting hard, non-porous surfaces like tile and glass, it’s not the right tool for walls. Bleach can remove the color from mold on surfaces like drywall, making it seem like the problem is gone. However, its chemical structure prevents it from soaking into porous materials to kill the mold’s roots. The water in the bleach solution soaks in, potentially feeding the remaining mold, while the chlorine stays on the surface. This is why mold often returns quickly after being treated with bleach. If you've been struggling with recurring mold, it might be time to contact a professional for a lasting solution.
Your Step-by-Step Guide to Removing Mold from Walls
Tackling a small patch of mold on your own can feel empowering, but it’s important to do it correctly to ensure it doesn’t come right back. This guide will walk you through the process for minor mold issues. Remember, the key to permanent removal is not just cleaning the surface but also fixing the moisture problem that caused it in the first place. If you’re dealing with a large area (more than 10 square feet) or suspect the mold is inside your walls, it’s always best to get a professional assessment. A professional mold removal service can safely handle extensive contamination and address the root cause.
Step 1: Prepare the Area
Before you touch any cleaning supplies, you need to get the room ready. Your first priority is to fix the source of the moisture. Whether it’s a leaky pipe, a crack in the foundation, or poor ventilation, that issue must be resolved, or the mold will inevitably return. Once that’s handled, clear the area of any furniture, decor, or belongings. Anything you can’t remove should be covered securely with plastic sheeting. Lay down plastic on the floor as well to catch any spores or debris that might fall during cleaning. This prep work contains the mess and prevents spores from spreading to other parts of your home.
Step 2: Clean the Mold
Now it’s time to clean. While many people reach for bleach, it’s often not the best choice for porous surfaces like drywall. Bleach can kill surface mold but may not penetrate deep enough to eliminate the roots, allowing it to grow back. A better option is plain white vinegar. Its acidic nature allows it to seep into the material and kill the mold at its source. Simply put undiluted white vinegar in a spray bottle, saturate the moldy area, and let it sit for at least an hour. Then, scrub the surface firmly with a brush and wipe it clean with water.
Step 3: Dry and Treat the Surface
This step is absolutely critical. After you’ve scrubbed the wall clean, you must let the area dry completely. Any lingering dampness is an open invitation for mold to return. Aim fans at the wall, open windows to create a cross-breeze, or use a dehumidifier to speed up the process. The surface should feel totally dry to the touch before you even think about moving on to the next step. Once it’s dry, you can apply a commercial anti-mold treatment or spray a light mist of vinegar on the area and let it air dry for added protection.
Step 4: Seal and Repaint
Once the wall is clean, dry, and treated, you’re ready for the final touches. Before you repaint, it’s a good idea to apply a stain-blocking, mold-resistant primer. This creates a barrier that helps prevent any residual stains from bleeding through and inhibits future mold growth. After the primer has dried according to the manufacturer’s instructions, you can paint the wall with a high-quality, mold-resistant paint. This final layer provides long-lasting protection and restores your wall to its original look. Taking this extra step ensures your hard work pays off for years to come.
How to Control Humidity and Stop Mold Growth
Once you’ve cleaned the mold off your walls, the next step is to make sure it doesn’t come back. Since moisture is mold’s best friend, controlling the humidity in your home is the single most effective way to prevent regrowth. Think of it as changing the environment so mold simply can’t get comfortable. In a humid climate like we have here in North Carolina, this is an especially critical step for homeowners. High humidity doesn't just feel sticky and unpleasant; it creates the perfect breeding ground for mold spores to settle and multiply on your walls, in your closets, and even in your attic.
Creating a drier indoor environment makes your home less hospitable to these unwanted guests. This isn’t about making your home feel like a desert; it’s about maintaining a balanced and healthy level of moisture in the air, ideally between 30% and 50%. By managing humidity, you’re not just fighting mold. You’re also creating a more comfortable living space, protecting your home’s structure from moisture damage, and safeguarding your family’s health from allergens. The following steps will help you take control of the moisture levels in your home for good. If you're dealing with a persistent problem, professional mold removal is the best way to start with a clean slate.
Use Dehumidifiers Effectively
A dehumidifier is a fantastic tool for pulling excess moisture right out of the air, and it’s a must-have for any damp-prone areas of your home. Basements, crawl spaces, laundry rooms, and bathrooms are prime candidates. To get the most out of your dehumidifier, make sure it’s the right size for the room and set it to maintain a humidity level between 30% and 50%. You’ll also need to empty the water collection tank regularly, or if possible, set up a hose for continuous drainage. Simple habits also make a big difference, like wiping down the shower walls and door after each use to stop moisture from lingering.
Keep an Eye on Humidity Levels
You can’t manage what you don’t measure. Controlling humidity starts with knowing your home’s current levels. An inexpensive digital hygrometer can give you an accurate reading of the relative humidity in any room. Place a few in different areas of your home to get a clear picture. Beyond the numbers, pay attention to other clues. If you see condensation forming on windows or feel a persistent dampness in the air, your humidity is likely too high. Regularly monitoring these levels allows you to be proactive and make adjustments before mold has a chance to form. Our team at Remtech Environmental is always ready to help you identify problem areas.
Dry Wet Areas Immediately
Mold can begin to grow in as little as 24 to 48 hours on a damp surface. That’s why it’s so important to dry any wet areas as soon as you find them. Make it a habit to regularly check under sinks, around the base of toilets, near your water heater, and around window sills for any signs of moisture. If you have a small spill, a minor leak, or notice condensation, clean it up and dry the area completely with a fan or cloth. If you discover a larger issue like a burst pipe or a persistent leak, it’s crucial to act fast. Addressing the source of the water and thoroughly drying the area can prevent a major mold problem from developing.
Improve Ventilation to Prevent Mold
Mold thrives in stagnant, humid environments, which is why improving your home’s ventilation is one of the most effective ways to stop it from growing. Think of it as giving your house a chance to breathe. When air flows freely, it whisks away the excess moisture that mold spores need to take root on your walls, ceilings, and other surfaces. Stale, damp air is an open invitation for trouble, but a well-ventilated space creates an environment where mold simply can’t get comfortable.
Making a few simple changes to your daily routine can dramatically reduce indoor humidity and keep your air fresh and clean. Good airflow helps regulate temperature, reduces condensation, and prevents the buildup of pollutants, creating a healthier living space overall. These proactive habits are your first line of defense against mold. However, if you already have a persistent mold issue or notice a musty smell you can’t locate, it’s important to seek professional mold removal services. A professional team can address the root cause and ensure the problem is handled safely and effectively, protecting your home and your health. For now, let’s focus on the simple yet powerful steps you can take to keep your home’s air moving and mold-free.
Use Your Exhaust Fans
Your kitchen and bathroom are prime spots for moisture buildup, thanks to cooking steam and hot showers. That’s why your exhaust fans are so important. Make it a habit to switch on the fan every time you cook or bathe, and let it run for about 15 to 20 minutes afterward to clear out all the humid air. This simple action pulls moisture directly outside before it has a chance to condense on your walls and ceilings. Don’t forget to clean the fan vents every few months, as dust and grime can block airflow and make them less effective.
Open Windows for Natural Airflow
One of the easiest and most cost-effective ways to improve ventilation is to simply open your windows. Cracking them open for just 15 minutes a day allows fresh outdoor air to circulate, pushing out the damp, stale air that has accumulated inside. This is especially helpful in the morning to clear out moisture from breathing all night. If you have rooms without exhaust fans, like bedrooms or living areas, regular fresh air is even more critical. As a local team, we know how North Carolina’s humidity can impact homes, and we believe in simple, effective solutions that our neighbors can use to maintain a healthy living environment. You can learn more about our commitment to the community on our website.
Encourage Air Circulation
Mold loves to grow in dark, hidden spots where air doesn't move, like behind a bookshelf pressed against a wall or in a cluttered closet. To prevent this, encourage air to circulate throughout your entire home. Try to leave a few inches of space between large furniture and walls. This small gap allows air to flow freely, keeping the wall surface dry. You can also use ceiling fans or place a portable fan in a stuffy room to keep the air moving. Even leaving closet doors slightly ajar can make a difference. If you find mold in these hidden areas, it’s best to contact a professional to assess the situation.
Moisture-Resistant Products That Prevent Mold
Once you’ve cleaned the mold and fixed the moisture source, your next goal is to make sure it doesn’t come back. Choosing the right building materials can make a huge difference in preventing future growth. Think of it as creating a line of defense right on your walls, in your bathrooms, and within your home’s structure. These products are designed to handle humidity and moisture, giving mold less opportunity to take hold. By being strategic with your repairs and renovations, you can build a healthier, more resilient home environment. This proactive approach is key to keeping your walls clean for good.
Mold-Resistant Paints and Primers
If you’re repainting after a cleanup, don’t just grab any can of paint. Opt for a mold-resistant paint or primer specifically formulated with antimicrobial agents that inhibit the growth of mildew and mold. These are especially important for bathrooms, kitchens, basements, and any other area prone to dampness. Before you paint, it’s critical that the wall is completely clean and dry, and that any underlying moisture issues have been resolved by a professional mold removal service. Applying this type of paint over an existing problem won’t solve it, but using it on a properly prepared surface provides an excellent layer of long-term protection.
Waterproof Sealants for At-Risk Areas
Mold often finds its way into a home through tiny, unseen gaps and cracks. Applying a waterproof or mold-resistant sealant to vulnerable areas is a simple yet powerful preventative step. Use it to seal joints around windows, door frames, baseboards, and where pipes enter the walls in your kitchen and bathrooms. This creates a watertight barrier that stops moisture from seeping into the wall cavity, a common starting point for mold. Taking an afternoon to caulk these at-risk spots can save you from dealing with a much bigger problem down the road. You can find more home maintenance tips in our resource library.
Better Insulation to Reduce Condensation
Condensation is a major culprit behind wall mold, especially on walls that face the outdoors. When warm, humid indoor air hits a cold wall, moisture forms, creating the perfect damp spot for mold to thrive. Proper insulation helps keep your interior wall surfaces warmer and closer to the room’s temperature, which significantly reduces condensation. If you have recurring mold issues on exterior walls, it might be worth having your insulation inspected. The team at Remtech Environmental understands how your home’s systems work together to prevent issues like this, ensuring a comprehensive solution. Good insulation not only prevents mold but also makes your home more energy-efficient.
When to Call a Professional for Mold Removal
While tackling a small spot of mold on your own can feel empowering, some situations are best left to the experts. Knowing your limits is key to protecting your home and your health. A professional mold remediation team has the training, equipment, and protective gear to handle serious mold problems safely and effectively. If you encounter any of the following scenarios, it’s time to put down the spray bottle and pick up the phone. Trying to manage a large or complicated mold issue yourself can often make the problem worse by spreading spores to other areas of your home.
The Mold Covers a Large Area
If the mold patch is larger than 10 square feet (roughly a 3-foot by 3-foot area), it’s a job for a professional. Widespread mold growth is a sign of a significant underlying moisture problem that a simple surface cleaning won't fix. Professionals can handle these extensive infestations safely, using containment measures to prevent spores from becoming airborne and spreading. They also have specialized equipment to ensure every trace of the mold is removed from your home. Our mold removal services are designed to address large-scale issues thoroughly, giving you peace of mind that the job is done right.
You Suspect Hidden Mold
Sometimes the most dangerous mold is the kind you can't see. If you notice a persistent musty smell that doesn't go away, or if you see signs of water damage like stained or peeling wallpaper with no visible mold, you could have a hidden colony growing behind your walls, under your floors, or in your ceiling. Professionals use tools like moisture meters and infrared cameras to locate hidden mold without tearing your walls apart unnecessarily. Our proven mold removal process includes a thorough inspection to find the source and ensure we address the entire problem, not just the visible part.
You Have Health Concerns or Structural Damage
Your health should always be the top priority. If anyone in your home is experiencing unexplained allergies, respiratory issues, or other chronic symptoms, mold could be the culprit. The health risks of damp and mould are well-documented, especially for children, the elderly, and those with compromised immune systems. Furthermore, if you notice warped walls, soft floorboards, or crumbling drywall, the mold may have already caused structural damage. In these cases, it is crucial to contact a specialist immediately to assess the situation and ensure your home is safe.
Frequently Asked Questions
I found a small spot of mold. Can I just paint over it? Painting over mold is one of the most common mistakes people make. While it might seem like a quick fix, it only hides the problem temporarily. The paint will trap moisture against the wall, which can actually help the mold continue to grow underneath. Before long, the mold will eat through the new paint, and you’ll be right back where you started. You have to completely clean the mold and let the area dry thoroughly before you even think about priming and painting.
How can I tell if it’s mold or just mildew or a water stain? It can be tricky to tell the difference sometimes, but there are a few clues. Mildew is a type of mold that usually looks powdery or downy and is often gray or white. Mold, on the other hand, can be fuzzy or slimy and appears in various colors like black, green, or blue. A simple water stain is typically flat against the wall and looks like a brown or yellowish ring. Ultimately, since both mold and mildew are fungi that thrive on moisture, the removal and prevention steps are very similar.
Is all black mold the dangerous "toxic black mold" I hear about? The term "toxic black mold" can be scary, but it's important to know that the color of the mold doesn't determine how dangerous it is. Many types of mold are black, and not all of them produce toxins. The only way to know for sure is through professional testing. Regardless of its color or type, any mold in your home should be removed because it can cause property damage and trigger allergic reactions or respiratory issues. The focus should always be on safe removal, not on identifying the specific strain yourself.
Why would mold grow back after I cleaned it so carefully? If mold returns after you’ve cleaned it, it almost always means the underlying moisture problem was never solved. You can scrub a wall perfectly, but if a slow pipe leak, high humidity, or poor ventilation is still present, you’re just creating a clean slate for the mold to grow on again. Think of cleaning as just one part of the solution; finding and fixing the source of the water is the most critical step to ensure it doesn't come back.
My house is fairly new. How could I already have a mold problem? It’s surprising, but new homes can be just as prone to mold as older ones. Sometimes, building materials can get wet during construction and trap moisture inside the walls. Also, modern homes are often built to be very airtight for energy efficiency. While this is great for your heating bill, it can also trap humidity inside if the ventilation system isn't working properly, creating the perfect conditions for mold to grow.